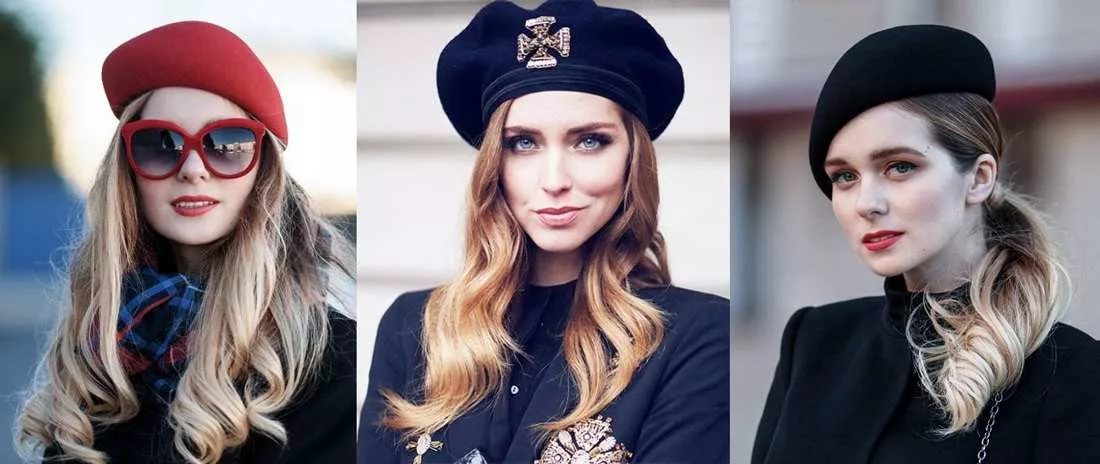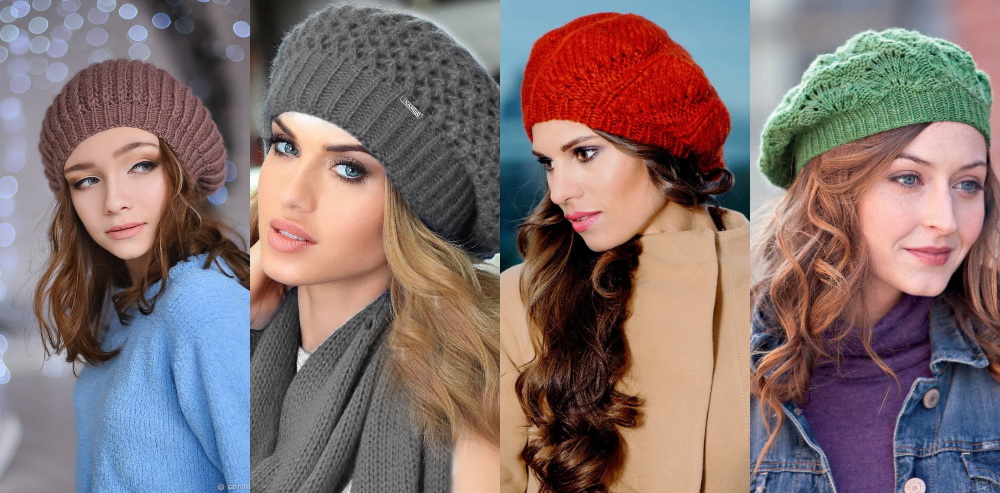
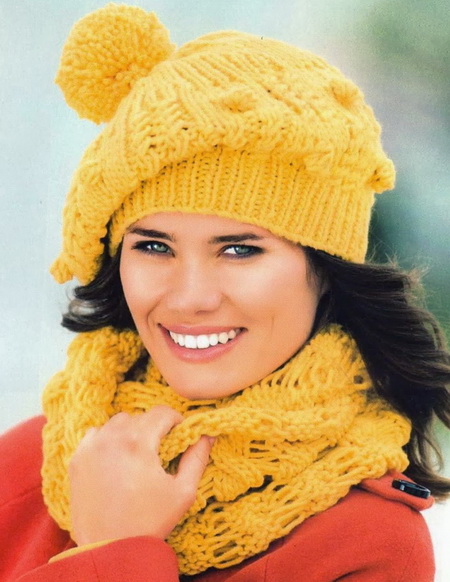
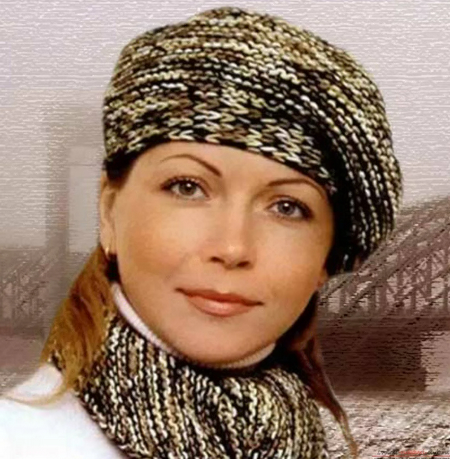
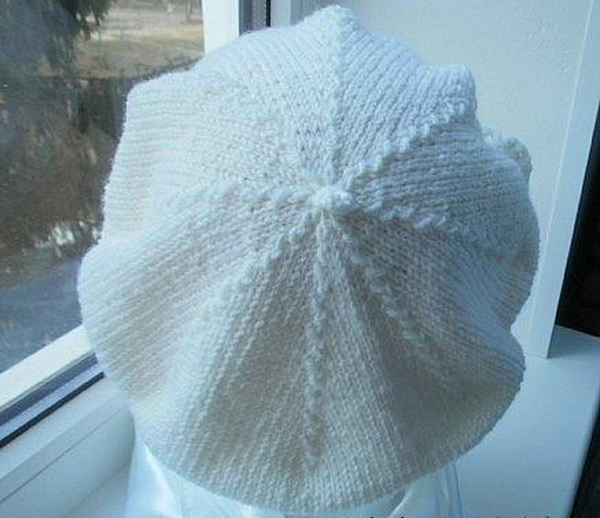
Very often, the variety of headwear offered on store shelves only complicates the creation of a beautiful image with outerwear. When it is difficult to make a choice, it is worth paying attention to berets. This is a universal option that harmoniously combines classics and modern trends. If desired, you can not limit yourself to factory products, but knit an original beret with knitting needles according to individual parameters. A hand-made model will look especially stylish and colorful, attracting attention. Using the right yarn, you can choose an option for any age, style and time of year. Detailed master classes with diagrams and descriptions, as well as step-by-step photographs will help you cope with the knitting process without problems.
- Selecting yarn and tools
- How to determine the size of the product
- The best master classes on knitting different models
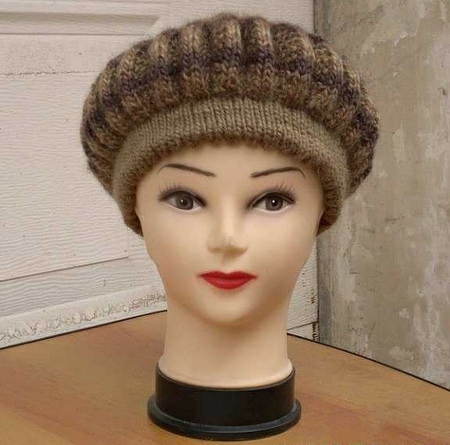
- Basque beret
- Volume
- Garter stitch
- English elastic
- With leaves
- In the form of a pumpkin
- Openwork
- With braids
- Classic Nutlet
- Seamless on circular needles
- Ideas for a male model
- Decor options
- How to make a pompom
- Video
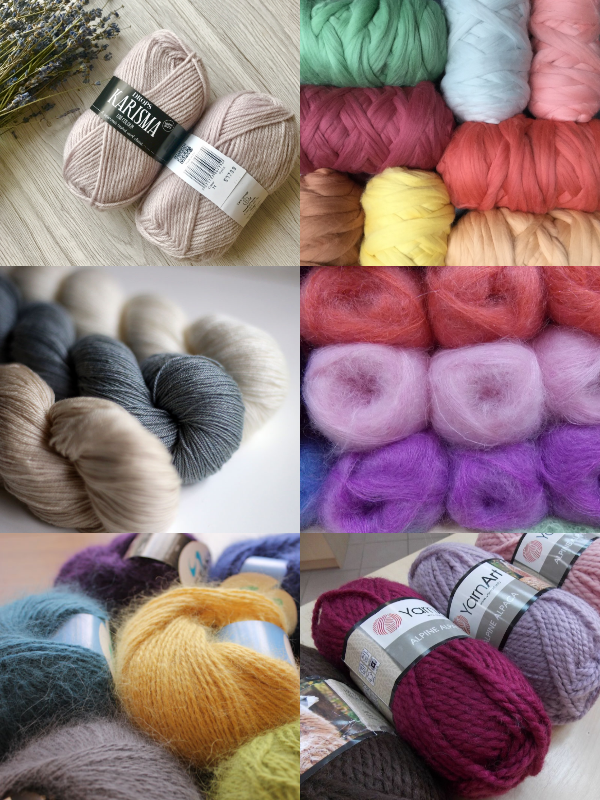
Selecting yarn and tools
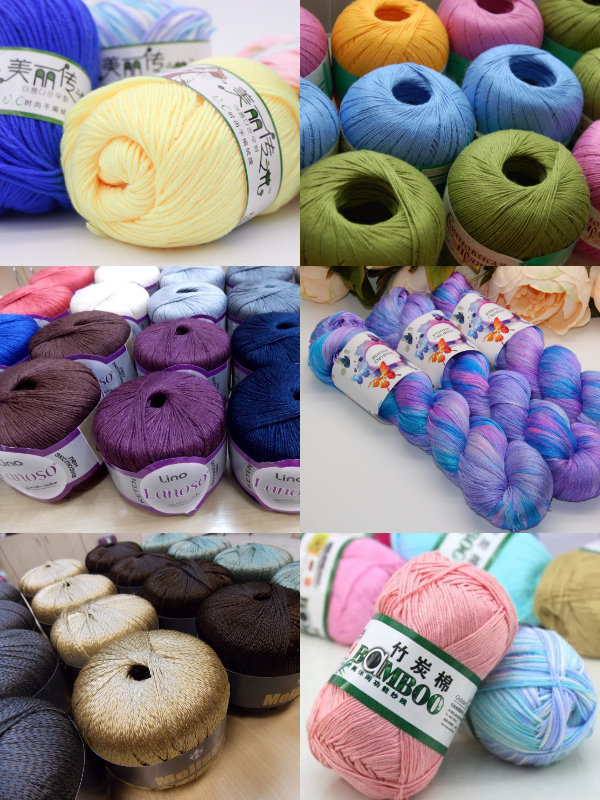
Work on a beret begins with choosing threads. There are several types of yarn suitable for knitting hats. Wool is the best choice for winter, it allows moisture and air to pass through well, while retaining heat. The advantages also include naturalness and elasticity. The disadvantages include the ability to stretch excessively and roll. The following types of wool yarn are popular among craftswomen:
- "100% wool" - this inscription on the label means that there are no impurities of synthetic threads in the composition. Thin yarn is suitable for elegant products that lay down in folds well. For a beret with a relief pattern, thicker threads are required. Medium thickness is rarely used for knitting hats.
- Merino is a very soft, delicate yarn, used for children's products, as it does not irritate the skin.
- Cashmere is one of the finest types of wool yarn. The fabric is warm, elegant and wear-resistant. Most often, it is supplemented with other types of threads.
- Mohair is a fluffy, thin raw material. Due to its high cost, it is supplemented with other yarn. Knitted berets made from this material are very warm.
- Angora - rarely found in its pure form. Finished products are characterized by their fineness and elegance.
- Alpaca - has a hollow fiber structure, which helps retain heat. The long thread length, compared to other types of wool yarn, virtually eliminates the formation of pellets.
Other yarn options suitable for making a beret include:
- Acrylic is a synthetic yarn. It is characterized by increased strength, which explains the frequent use of the material as an additive to thinner wool threads. It is not recommended to knit from acrylic in its pure form, since the product will be too dense and not breathable. The content of synthetic additives in the composition should not exceed 10-20% in order to preserve the qualities of the main yarn. Ignoring this rule leads to the fact that the product will poorly absorb moisture, poorly let air through and retain heat.
- Cotton — natural yarn, you can knit a summer beret from it. Finished products look stylish, while giving a feeling of coolness. Highly twisted types of cotton threads are not suitable for knitting, for example, "Iris" - yarn that is compatible only with a crochet hook.
- Flax is another example of a natural material that is suitable for making summer hats. Knitted fabrics are stiffer, less elastic, compared to analogues made of cotton, so it is preferable to use a crochet hook.
- Silk - the thread here is thin, soft and strong at the same time. Pills practically do not form on the products. Due to the fact that the yarn retains a feeling of coolness well, it is recommended for summer products. Due to the high cost, silk threads are mixed with viscose and cotton during production.
- Viscose (also known as “artificial silk”) is characterized by a much weaker ability to let air through and absorb moisture compared to natural yarn, so the products are not suitable for hot summers.
- Bamboo is a strong, soft yarn. It absorbs moisture better than others, and skin reactions are excluded. Taking all this into account, it is recommended for children's summer hats.
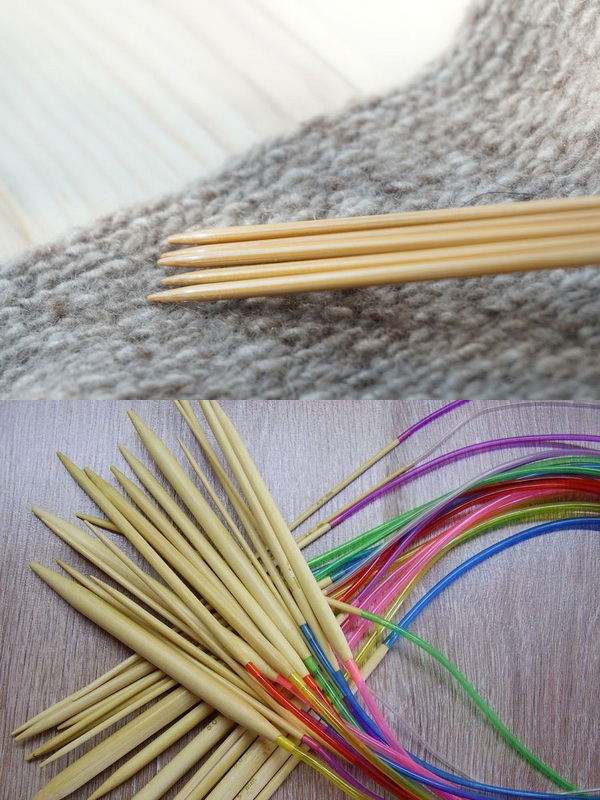
The quality and appearance of the finished product depend on the correct combination of thread thickness and knitting needles. An openwork beret, for example, is knitted with tool No. 1–3. Determining the diameter is easy. To begin with, you can read the contents of the label. If you do not have access to this information, fold a small piece of thread in half and apply it to a ruler.
Some tools do not have indications of their size. A special template helps to find out. You can also use a sheet of paper - just pierce it with a knitting needle and measure the resulting hole.
To knit a beret with knitting needles, you should decide on the style of the product. Based on this parameter, select the tool. Most often, a set of 5 knitting needles, known as stocking needles, is taken, although in some cases, circular models will do.
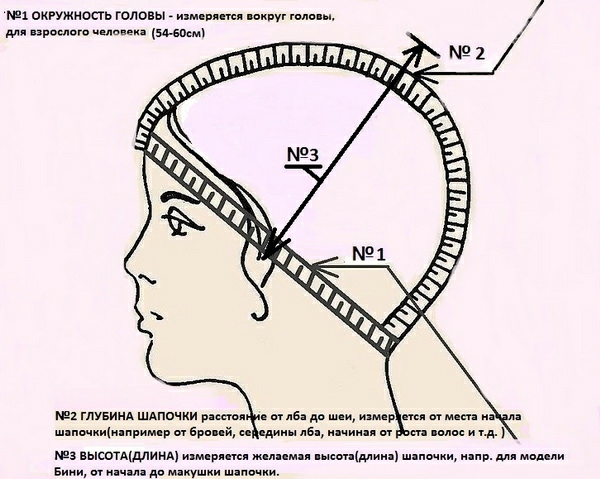
How to determine the size of the product
Work on the beret begins with obtaining the necessary measurements:
- circumference - a measuring tape runs from the center of the forehead in a circle through the middle of the back of the head;
- distance from the crown - from the middle of the head to the edge.
Some important points about beret depth:
- to the ear - the indicator is equal to 1/3 of the head circumference;
- to the middle of the ear - 1–1.5 cm is added to the head circumference (HC);
- to the earlobe - the increase is from 2-3 cm.
If the yarn is elastic, 1 cm is subtracted from the diameter of the product (it is equal to half the OG). This ensures that the headdress will fit well. The same allowance is necessary if the knitted beret will have a lining.
Loop calculation:
- The selected pattern is used to knit a 5 x 5 square to determine the knitting density and the number of loops in 1 cm.
- The resulting number is multiplied by OG.
According to the calculations given, it is convenient to knit berets with knitting needles using any pattern. If you plan to use tools of different diameters, it is recommended to knit two samples. But it is better to stick to a single canvas density when working.

The best master classes on knitting different models
There are many patterns for berets. Some of them are suitable for summer models, others for winter ones. Craftswomen who don’t have enough experience are better off starting with simple ones. A detailed master class in any case makes the work much easier.
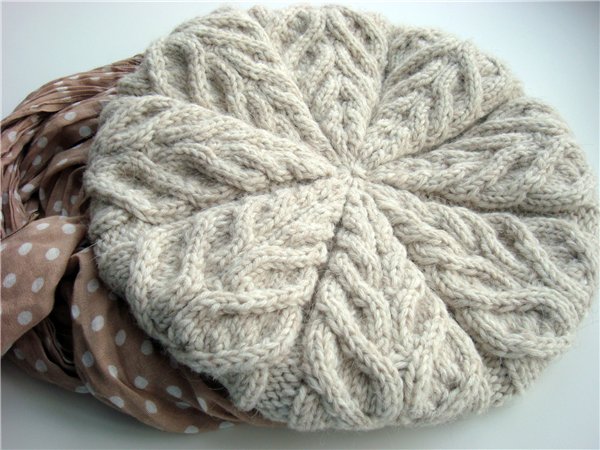
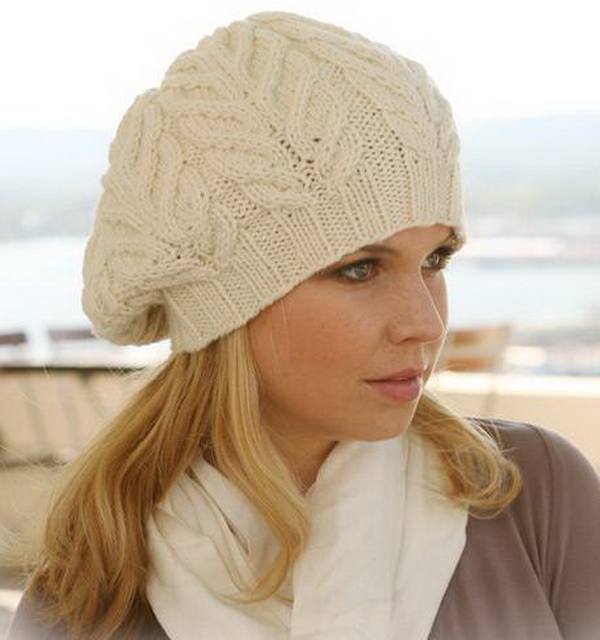
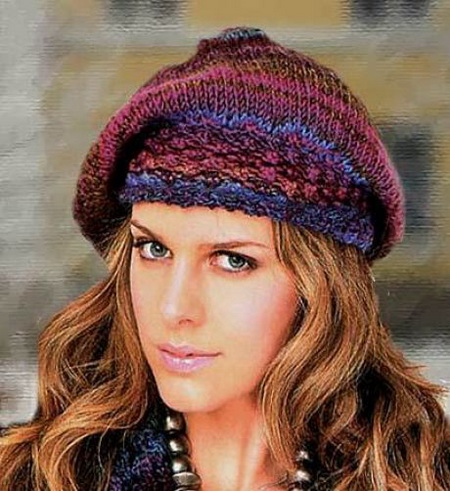
Basque beret
A universal model that will suit many women. For work you need:
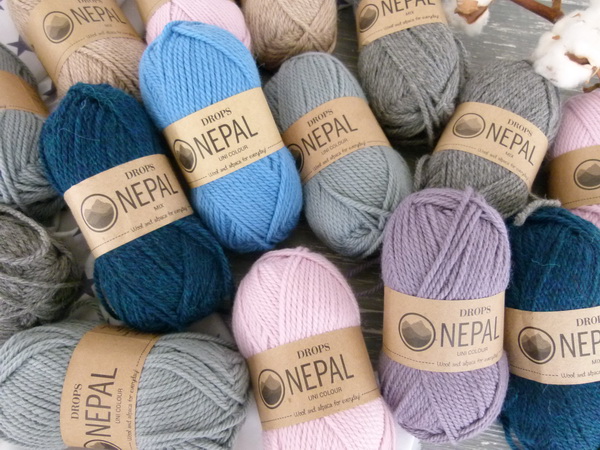
- Drops Nepal yarn - 150 g;
- knitting needles - stocking, circular No. 3.5 and 5.
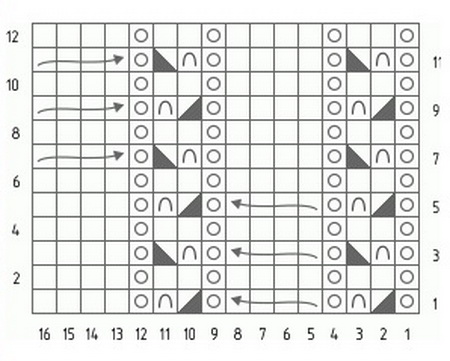
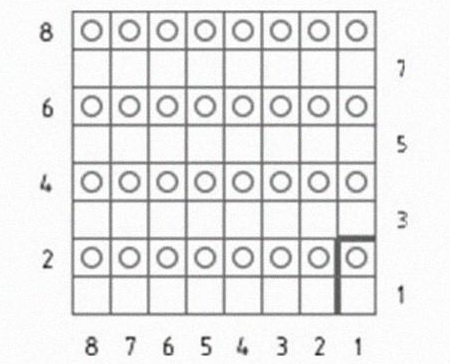
The diagram and description are calculated for a density of 17 loops per 10 cm in stockinette stitch. OG — 56–57 and 57–58 cm.
Often there is a section highlighted in red on the diagram. It is provided in case the knitting density differs from the specified one. To achieve the required height, the sector is knitted twice.
Work order:
- On knitting needles No. 3.5 knit 10 rows of 84/96 loops with a 3 x 3 elastic band. Start with three purl.
- Transfer the fabric to knitting needles No. 5. Then knit 3 IP (purl stitches), 1 LP (front stitch), yarn over, 1 LP, yarn over, 2 LP, 1 IP, 2 LP, yarn over, 1 LP, yarn over, 1 LP. You should get 112/128 stitches.
- Next 7/8 rapports *3 IP, pattern according to the diagram*, repeating from *.
- Continue knitting with stocking-type knitting needles of the same diameter as the circular ones.
- Having reached the required height, knit 3 purl stitches together, and in the next row do the same with 2 front stitches.
- Cut the thread and pull it through the remaining 14/16 loops in two turns. Pull tightly.
By knitting the yarn over through the back loop, you can avoid the formation of holes.
An equally beautiful beret can be made from other yarn. Some experienced craftswomen knit a higher elastic band, getting a double band. A longer model, part of which hangs down, looks interesting.
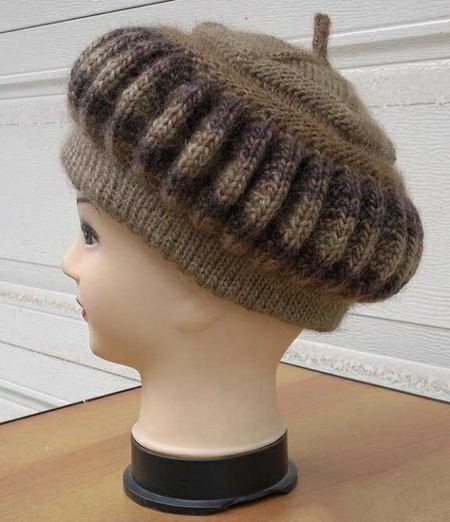
Volume
This model is ideal for cool autumn and even winter. The pattern used gives the product originality. To knit a voluminous beret with knitting needles, you will need a set of:
- 150 g yarn (55% wool);
- double pointed needles #5 and #6, plus an extra needle;
- markers.
The knitting pattern is designed for a bust of 54/56 cm. The density of the main pattern is 14.5 loops per 21 rows. Knowing these nuances, it is easy to make changes according to your own sizes.
Cast on 78 stitches on knitting needles #5, knit 4 cm with garter stitch (row 1 - only knit stitches, row 2 - only purl stitches, repeat). Transfer stitches to knitting needles #6. Evenly add 34 stitches and knit the main pattern step by step:
- Rows 1–4: knit stitches;
- Row 5: *8 LP, 1 bobble - remove 6 loops onto an additional knitting needle and knit 8 rows with front loops, transfer to the right main knitting needle*, repeat from * to the end;
- Rows 6–9: LP;
- Row 10: 1 LP, 1 cone, 7 LP.
Repeat rows 1 through 10 to the desired height. A total of 30 rows. Then work with knit stitches. Attach a marker to each 14th stitch and knit it with the previous stitch in each row. When there are 8 stitches left on the needle, cut the thread and carefully tighten it, passing its end through the stitches.

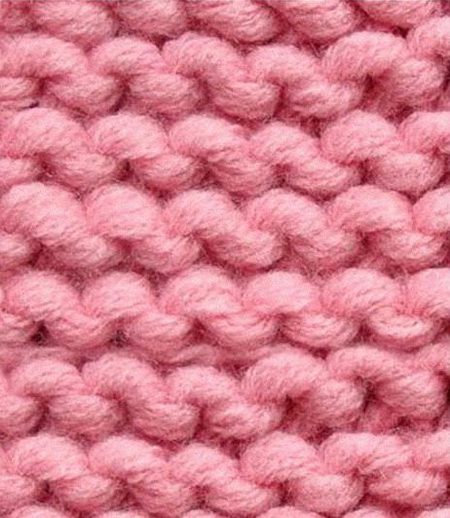
Garter stitch
This knitting pattern for a beret with knitting needles for beginners is the best. The versatility also lies in the freedom of choice of yarn. According to one description, you can knit a headdress for different times of the year.
To work you will need the following:
- circular knitting needles No. 3;
- Alize Angora Melange Colors yarn - about 100 g (480 m).
The pattern is designed for a density of 2 loops per 1 cm, OG - 57. To ensure the product fits tightly, subtract 2 cm. Further work order:
- Cast on 112 stitches, knit 6 rows with a one-and-a-half elastic band: all odd rows alternate between front and back stitches, even rows - knit only front stitches, and remove the back stitches, leaving the thread in front of the work.
- Make an increase of 10-20 loops. The next 14-16 cm are garter stitch.
- Close the bottom. In an odd row, knit 2 loops together, then 4 cm without decreases, another row with decreases, 1.5 cm without decreases, decrease for the last time. Knit 2 rows, gather the remaining loops on a thread, carefully pull together.
After finishing the work, the two edges are sewn together. The use of melange yarn makes the product original and elegant at the same time. But no less beautiful berets come out of other threads.
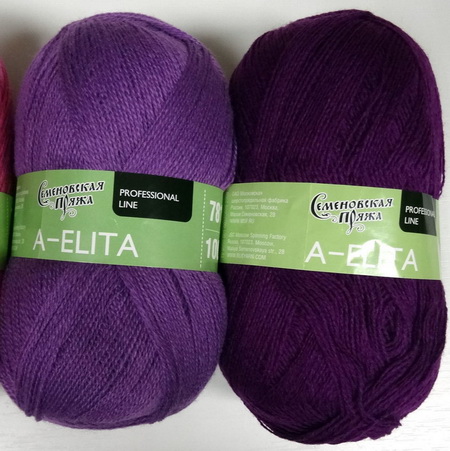
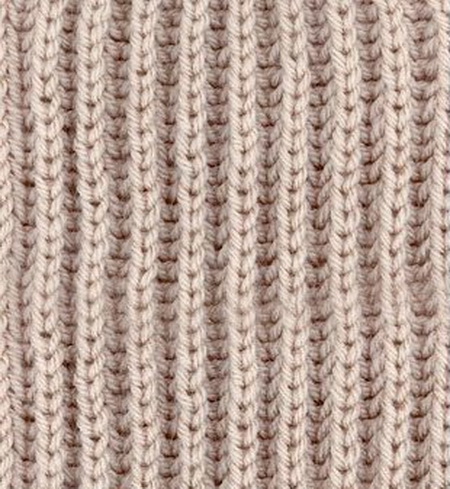
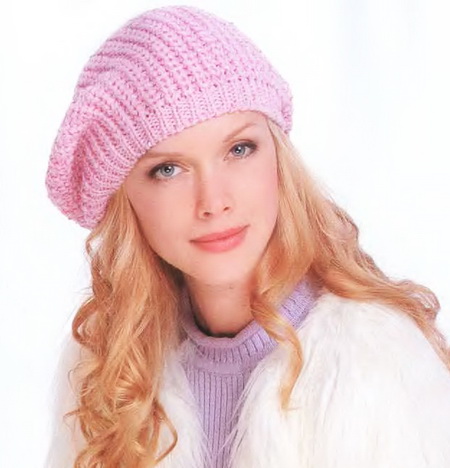
English elastic
The option is suitable for knitters with little experience. The finished fabric is voluminous. As in the case of garter stitch, the pattern is compatible with any thread.
You will need 100 g of Semenovskaya yarn "Aelita", knitting needles No. 3.5 and 4. The pattern is designed for a 56 cm bust. Work order:
- Cast on 84 stitches using the Italian method on size 3.5 knitting needles and knit 14 rows with a 1 x 1 elastic band.
- Transfer the loops to knitting needles No. 4 and knit 15 cm with English elastic: remove the front loop with a yarn over, knit the back loop.
- Return the loops to knitting needles No. 3.5, knit 10 rows with a 1 x 1 elastic band.
- Next, knit 4 rows of purl and knit together. Carefully pull together the remaining loops, sew the edges.
The beret with English elastic does not require adding loops after the band is made. This makes the model popular among beginner knitters. Although experienced craftsmen do not ignore this pattern.
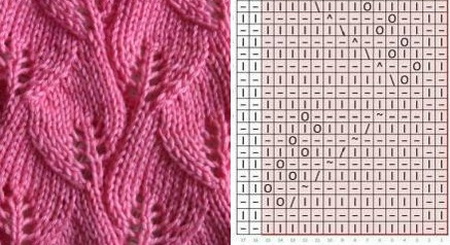
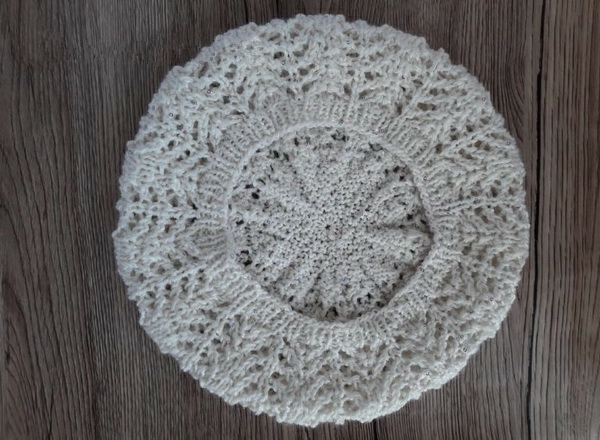
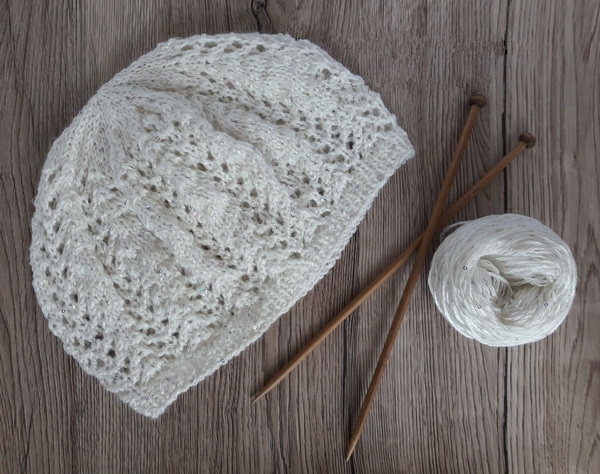
With leaves
An elegant and easy-to-make model. The original appearance attracts women of any age. The headdress is perfect for autumn.
Size - for OG 54-58 cm. The following tools and materials are required for the work:
- 100 g wool or semi-wool yarn (150–180 m);
- contrasting color thread 2-3 m;
- spool rubber band;
- circular knitting needles (length of line 40 cm), stocking needles No. 4 and straight needles No. 3.5;
- knitting marker.
Cast on 100 stitches with an auxiliary thread. Then knit a row of purl stitches with the main thread. Transfer the stitches to circular knitting needles and knit circular rows with a hollow elastic band:
- 1 row: *front, remove loop (thread remains in front of work)*, repeat to end of row, do not turn fabric;
- Row 2: *slip 1 stitch (yarn behind work), purl*, repeat.
Knit the circular rows twice. Carefully remove the auxiliary thread. Mark the beginning of the row with a marker, knit the curly elastic:
- 1 row: *front, yarn over, front, 2 purl*, repeat 25 times from *;
- 2nd row: *3 knit, 2 purl*, repeat;
- Row 3: *1 loop is removed as a purl on 2 knitted front loops, then the removed loop is thrown over, 2 purl*, repeat.
Repeat the entire process three times. Then knit all the loops as front loops. Add 35 loops. Knit the main pattern, repeat the sector 9 times. Evenly decrease the loops and transfer the work to stocking needles. Pull the remaining 9 loops together.
To prevent the knitted beret from stretching, a spool elastic is inserted into the edge. When slightly stretched, its length is equal to the OG. All seams should be neat.
In the form of a pumpkin
Knitted hats can have a variety of shapes. To make a beret that looks like a vegetable, you will need the following set:
- semi-woolen and woolen yarn - 100–150 g;
- circular knitting needles.
Work order:
- Cast on 90 stitches and knit 6 cm in a circle.
- Knit a row according to the pattern: two loops together, 1 yarn over. Again 6 cm knitwise.
- The stitches of the initial set are removed onto separate circular needles. Then the stitch from the additional and main needles is knitted together.
- Divide 90 loops into equal intervals of 3 loops. Total 30 teeth, in each 2 LP, 1 IP. In the following rows, make an increase of 6 loops on both sides of the purl and knit them with garter stitch.
- In places of increases, decreases are made through a row. Then 2 rows of purl, 1 of knit.
- Divide 90 loops into 15 sectors of 6 loops. Again, decrease through the row.
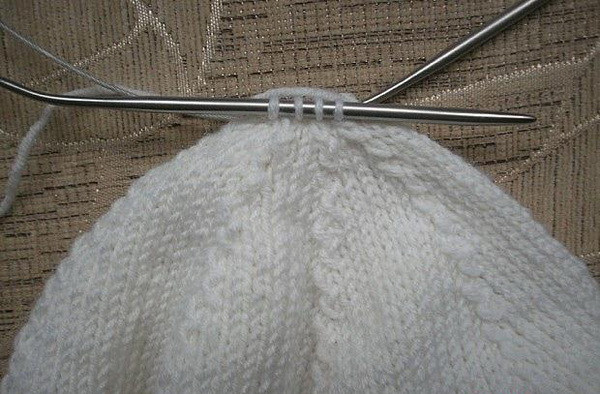
- From the remaining 6 loops, knit a loop of the desired length and secure the thread.
The resulting women's beret looks original. You can take any yarn and knitting needles. Using the pattern, it is easy to make changes to individual sizes.

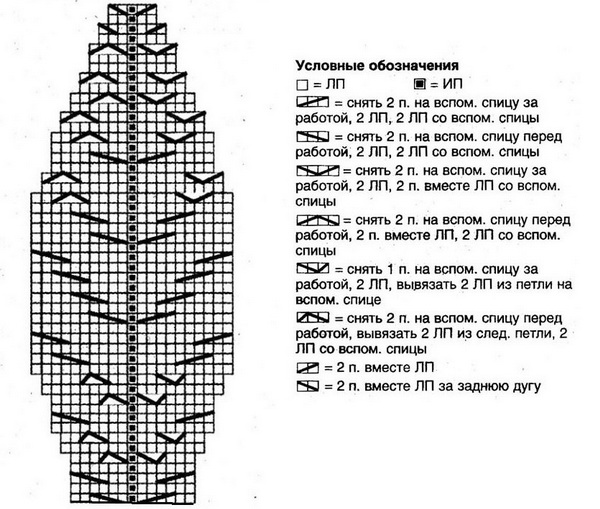
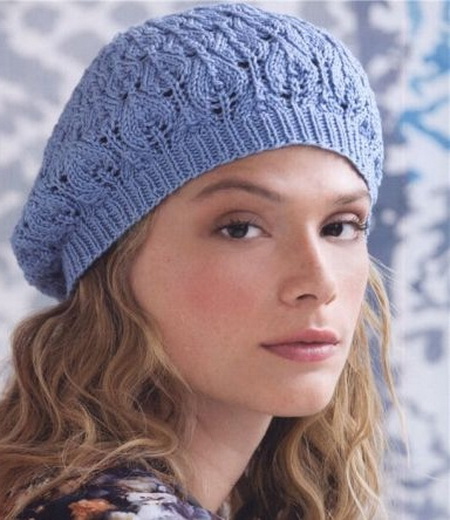
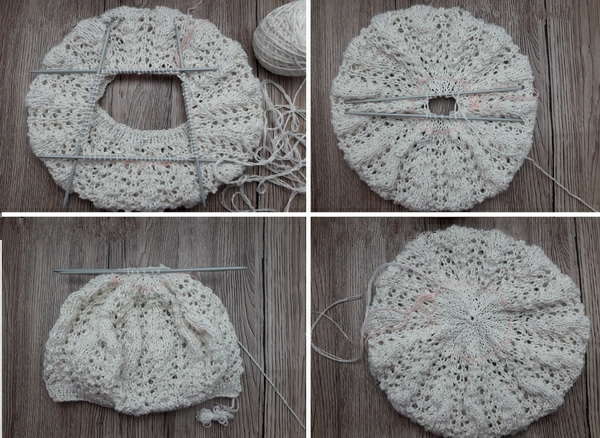
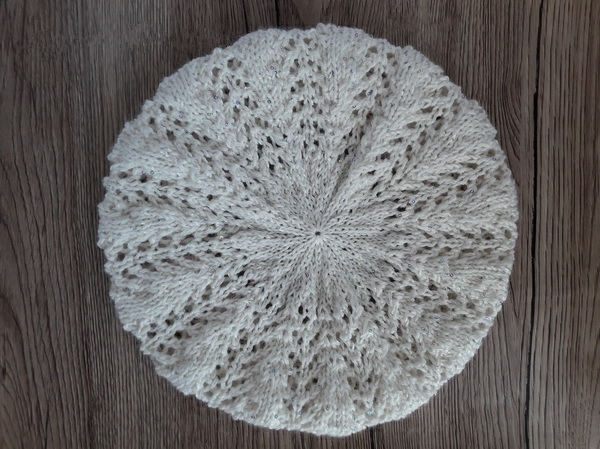
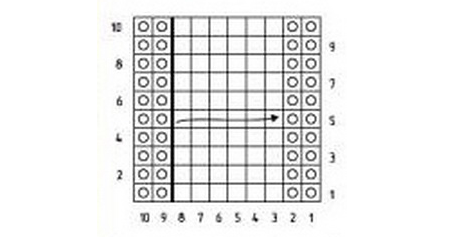
Openwork
Stylish and easy to make beret. Size of the OG - 51-56 cm. For work you will need a set:
- 70g Boutique Midnight yarn by RED HEART;
- circular knitting needles No. 5.5 and 8;
- double pointed needles No. 8;
- marker.
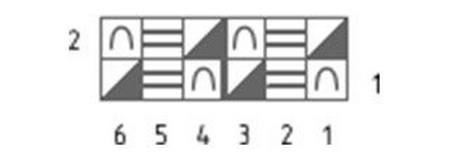
Knitting density for a 10 x 10 square is 13 loops, 16 rows. The following abbreviations are used in the pattern:
- 2PV - 2 loops together front (decrease);
- LPS - knit 2 front loops from one loop: first behind the front, then behind the back wall;
- H2PV - yarn over, knit the next 2 stitches together.
Work order:
- cast on 80 stitches, knit with a 2 x 2 elastic band for about 4 cm, then switch to No. 8 knitting needles and continue knitting for another 4 cm;
- Row 11: 4 times the LPZ are evenly distributed along the row, the rest are knit;
- Row 12: knit;
- Rows 13, 20, 27: *2PV, yarn over*, repeat;
- Rows 14–19, 21–25, 28: knit;
- Row 26: distribute evenly 4 times 2PV, the rest - front;
- Row 29: *3 knit, 2 PV*, repeat – 64 loops remain;
- Rows 30, 32, 36, 38: knit;
- Row 31: transfer knitting to double-pointed needles, *2 knit, 2 VP*, repeat;
- Rows 24, 37: 2VP to the end.
Pull the remaining 8 loops together with a thread, secure the remainder on the wrong side.
Openwork berets knitted with knitting needles look no less impressive than those crocheted.
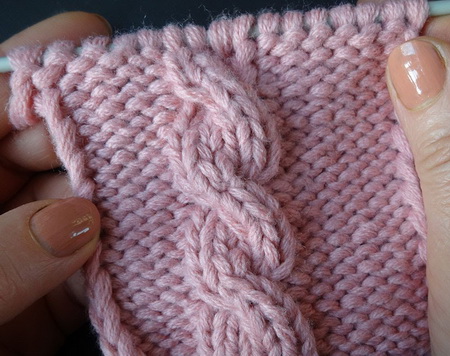
With braids
With this model, it is easy to add French chic to your look. For a beret of size 56–58, you will need a set of the following tools and materials:
- grey yarn - 200 g;
- stocking and circular knitting needles No. 4.5;
- auxiliary spoke;
- hook number 3.
Work order:
- Cast on 112 stitches on circular knitting needles, knit *3 RP 4 LP (braids)*, repeat 15 times. Continue working, forming wedges according to the pattern.
- The remaining 16 loops are pulled together with a thread. The lower edge is tied with a cloth in 6 rows. SC, another 1 row "crayfish step", using a hook.
By varying the thickness of the threads, you get a product of different density. The finished beret will look even more impressive if you use gradient yarn. Larger diameter knitting needles will accordingly give the product more volume.

Classic Nutlet
This classic beret is knitted from ANGORA GOLD BATIK yarn in 2 threads, knitting needles No. 2 and 2.5. The original size is 56-60 cm. Description:
- Cast on 128 cm using circular needles No. 2 and knit 4 cm with a 2 x 2 elastic band.
- Then 1 row of knit stitches.
- An increase of 32 loops is made by knitting two from one front loop at equal intervals.
- Transfer the work to knitting needles No. 2.5 and knit to 14 cm with the front stitches, counting from the cast-on edge.
- The work is divided into 8 wedges and 20 loops are decreased in each through a row.
- When there are 8 loops left on the knitting needles, knit a loop.
The loops are pulled together with thread, the remainder is removed to the wrong side and ironed.
Seamless on circular needles
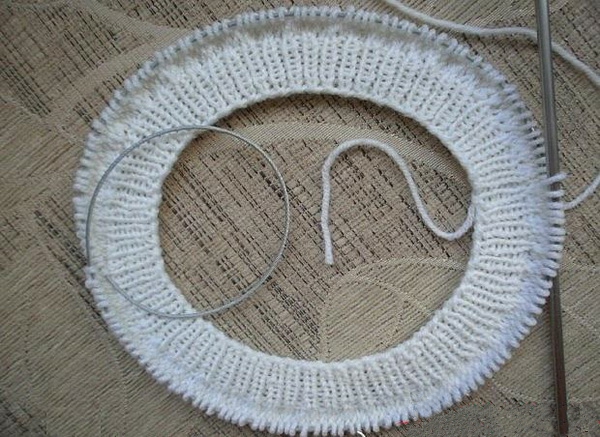
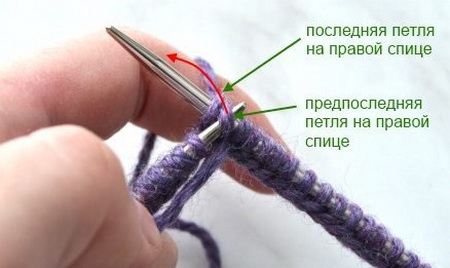
How to knit a beret without a seam, which is not always possible to make neat, is a common question for beginners. There is nothing complicated about it. For work you will need circular knitting needles with a line length of 40 cm. You can close the loops around in several ways:
- the first loop is knitted with the working thread and its free end;
- cast on one more stitch, remove it at the beginning of the circle, and knit it with the first one from the cast on at the end.
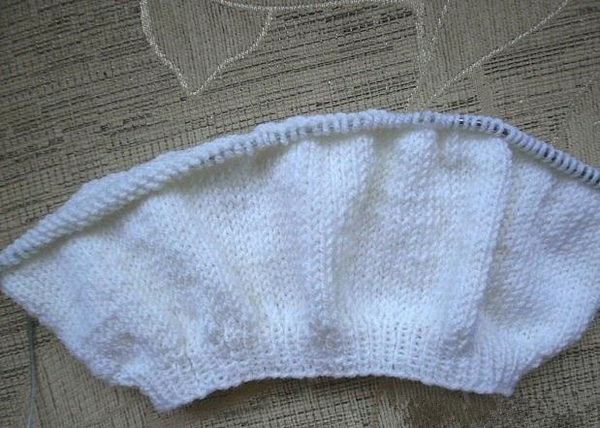
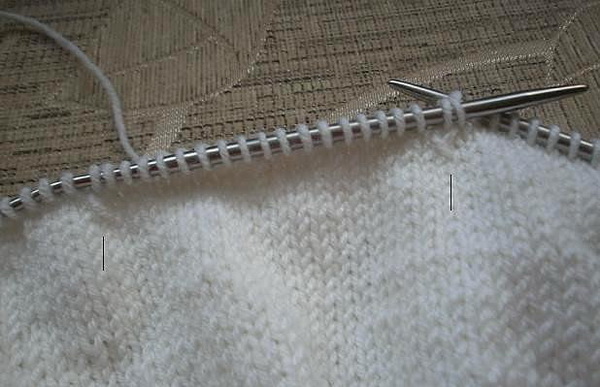
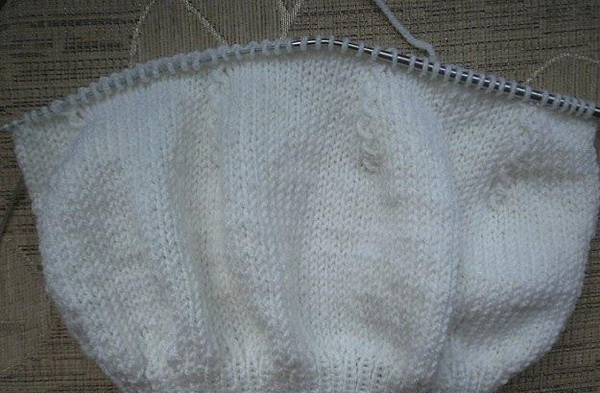
For inexperienced knitters, the first works are recommended to be done with simple patterns. Classic berets with knitting needles are the best example. More complex options should be used as you gain experience. The technique of working with circular seamless knitting is no different from the classic pattern. The main thing is to ensure that the fabric does not twist, in which case it will come out without steps.
Knitting a beret with knitting needles for a woman involves adding and decreasing loops. To make this easier, the row loop is marked with a special marker. This "beacon" will help to evenly distribute additional loops and reduce them.
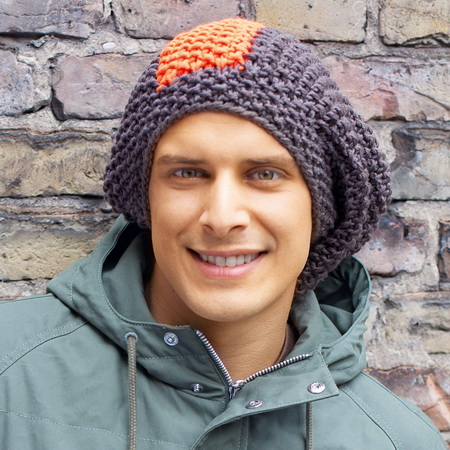
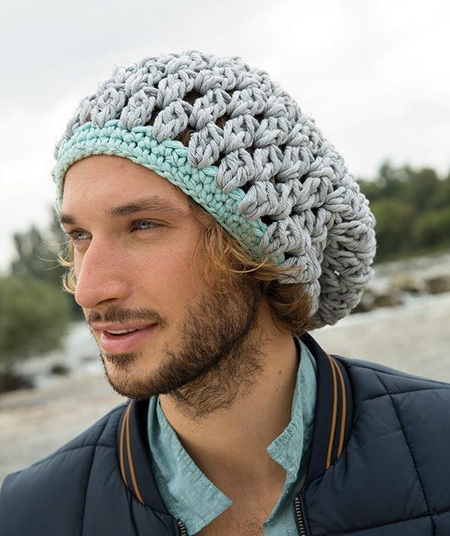
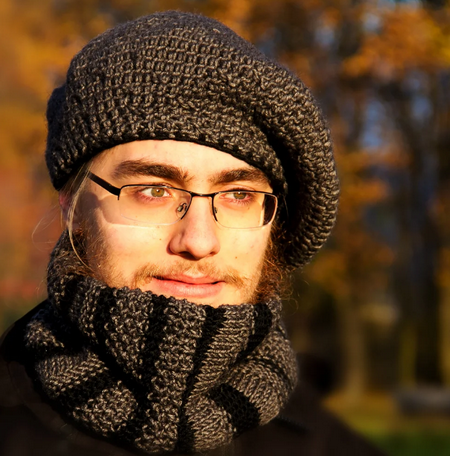
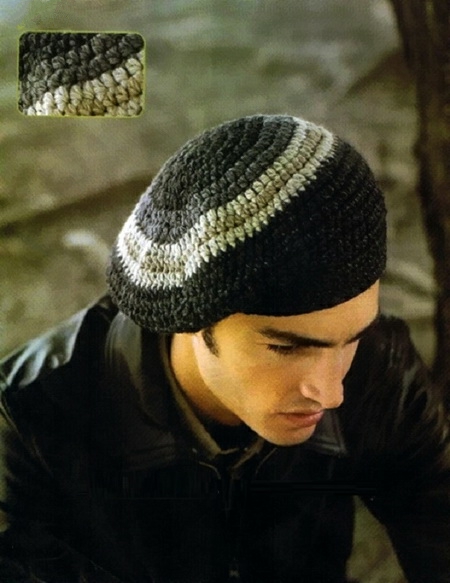
Ideas for a male model
You can knit not only women's but also men's berets. In the latter case, preference is given to simple patterns, such as stocking stitch, garter stitch. The trend of today is geometry. Such a pattern can be formed with front and back stitches. The colors should be restrained, for example:
- black;
- dark blue;
- sand.
You can try burgundy as an experiment. It is very popular among men. But in this case, the master must be very careful when choosing a pattern so that the men's beret looks exactly like that. Therefore, it is better to limit yourself to garter and stocking knitting. More complex options will deprive the image of masculinity, will look too cloying. To create a more harmonious ensemble, you can knit a scarf in the same pattern as the headdress. There are no special features in the execution of the work: a men's beret is knitted with knitting needles similar to women's models. The main thing is not to allow a large height so that the finished product does not hang down too much over the ear. The yarn is taken such that it does not give a lot of volume.
Decor options
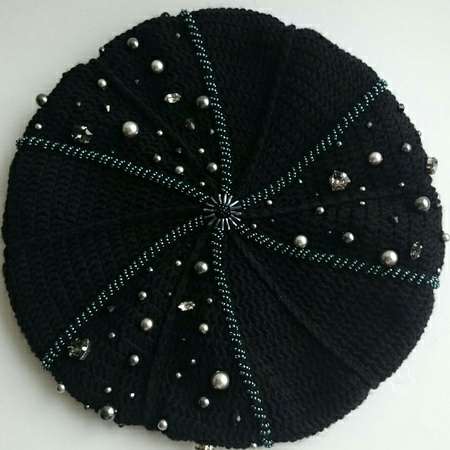
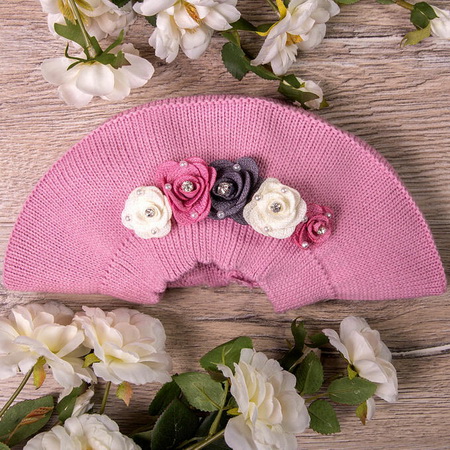
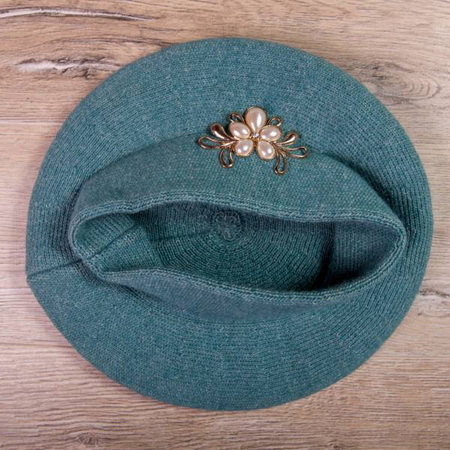
For women, a knitted beret is not just an accessory, but also a great way to emphasize your style. Therefore, such a wardrobe detail should be original. And the decor is no less important in solving this problem. You can decorate the finished product as follows:
- satin stitch or bead embroidery - goes well with simple patterns;
- felt decor - these can be flowers, butterflies;
- a brooch - it is better if it is removable, so that you can adjust the decoration to your mood or clothes.
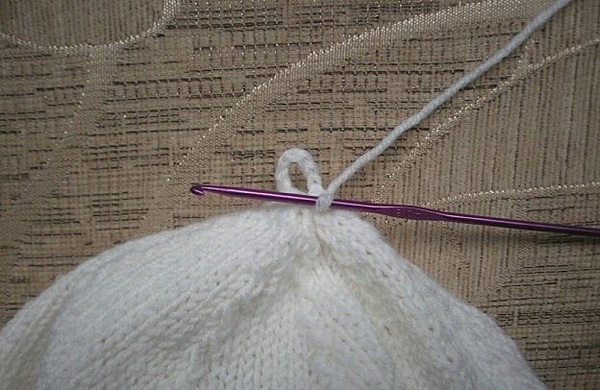
Quite often, the beret is decorated with a small loop at the very top point. This detail is easy to crochet. From the middle of the finished product, make a chain of the desired length, then descend with single crochets. Another version: separately dial 15 air loops, knit 4 rows. The loops are closed, the detail is folded in half and sewn to the central part of the beret.
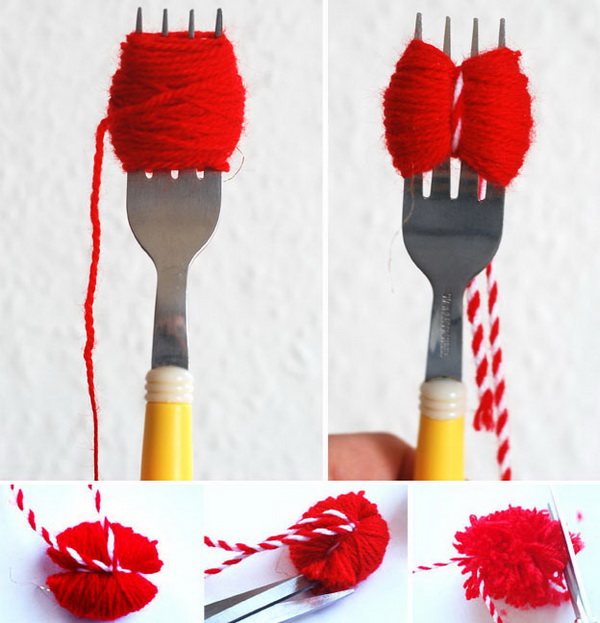
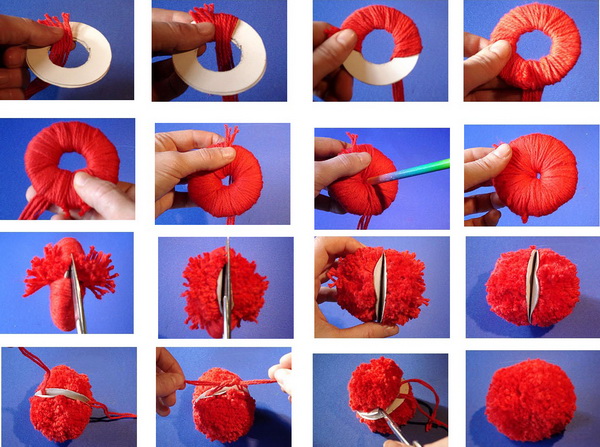
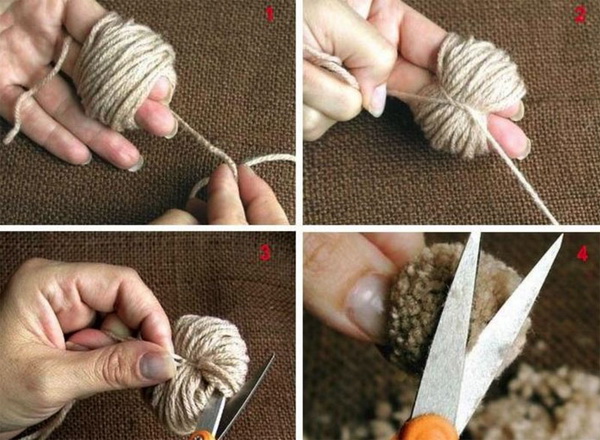
How to make a pompom
This is another interesting detail that is used as a decoration on hats for adults and children. Very often, knitting a beret with knitting needles with diagrams and descriptions contains an indication of it. It is not difficult to make a pompom:
- Two cardboard rings with a hollow middle are wrapped with threads until the gap almost completely disappears.
- The winding is cut along the outer edge, the rings are slightly moved apart, a thread is passed between them and pulled tightly.
- The cardboard is removed and the finished pompom is fluffed up.
If the decorative element is uneven, the ends are trimmed a little around the circle. The threads that were used to pull the pompom together are inserted into the middle of the beret and fixed from the inside.
Video