When creating clothing items, it is important to consider all the nuances. If, for example, you want to sew a skirt, you must first familiarize yourself with the existing styles. An interesting element of the cut is a slit on a skirt, which performs a number of functions and has certain features. Even a novice seamstress can sew a model with a slit, you just need to choose a suitable master class and follow the instructions.
What is it and its purpose
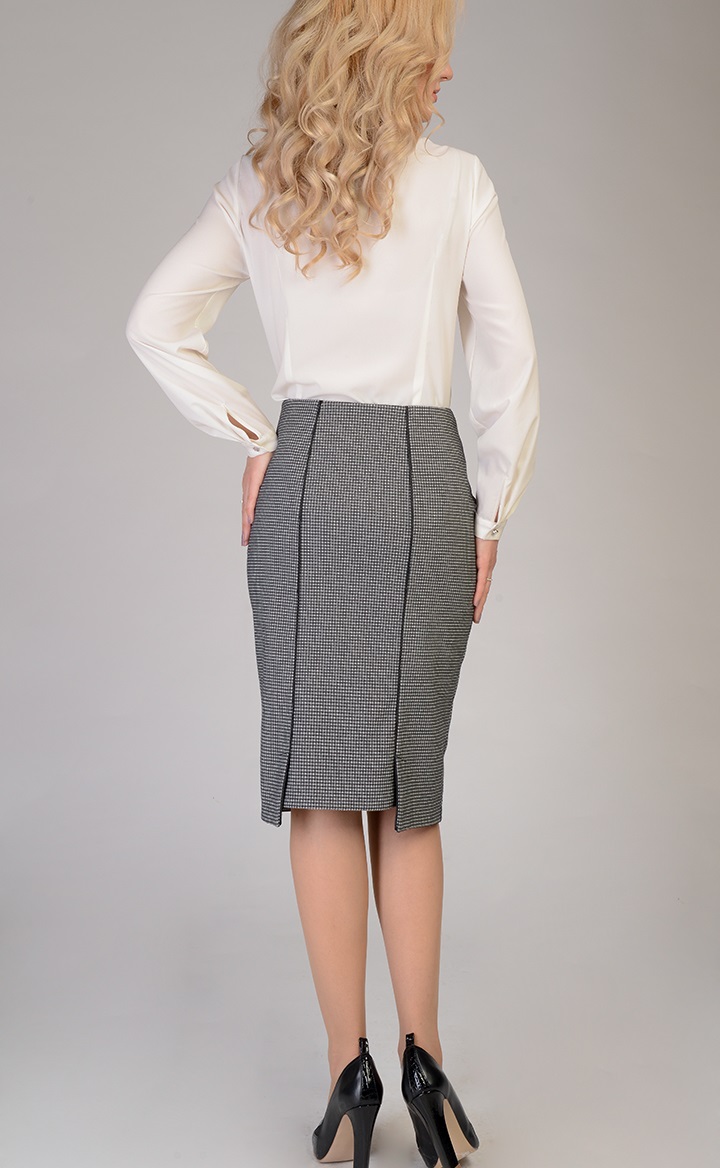
A vent is an open fold with or without a slit. The primary functional purpose is to ensure comfortable wearing. After all, a straight skirt made of thick fabric often restricts movement. And thanks to the presence of a slit, the step becomes wider and freer. In addition, decorative design plays an important role. For example, a pencil skirt with a slit acquires severity, sophistication and refinement. It is especially suitable for business looks.
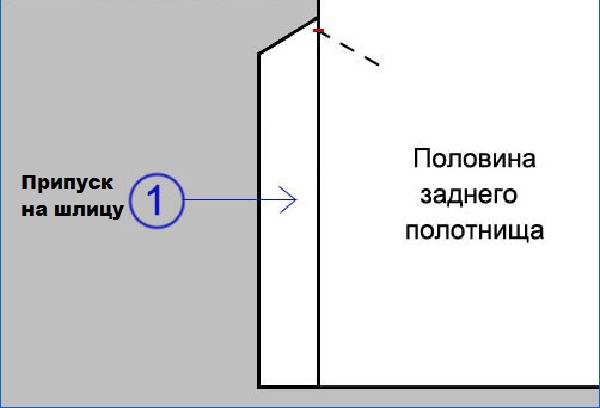
The vent is found in both men's and women's wardrobes. Regardless of the item of clothing, it requires the same execution. This element is located strictly in the seams at the bottom of the product.
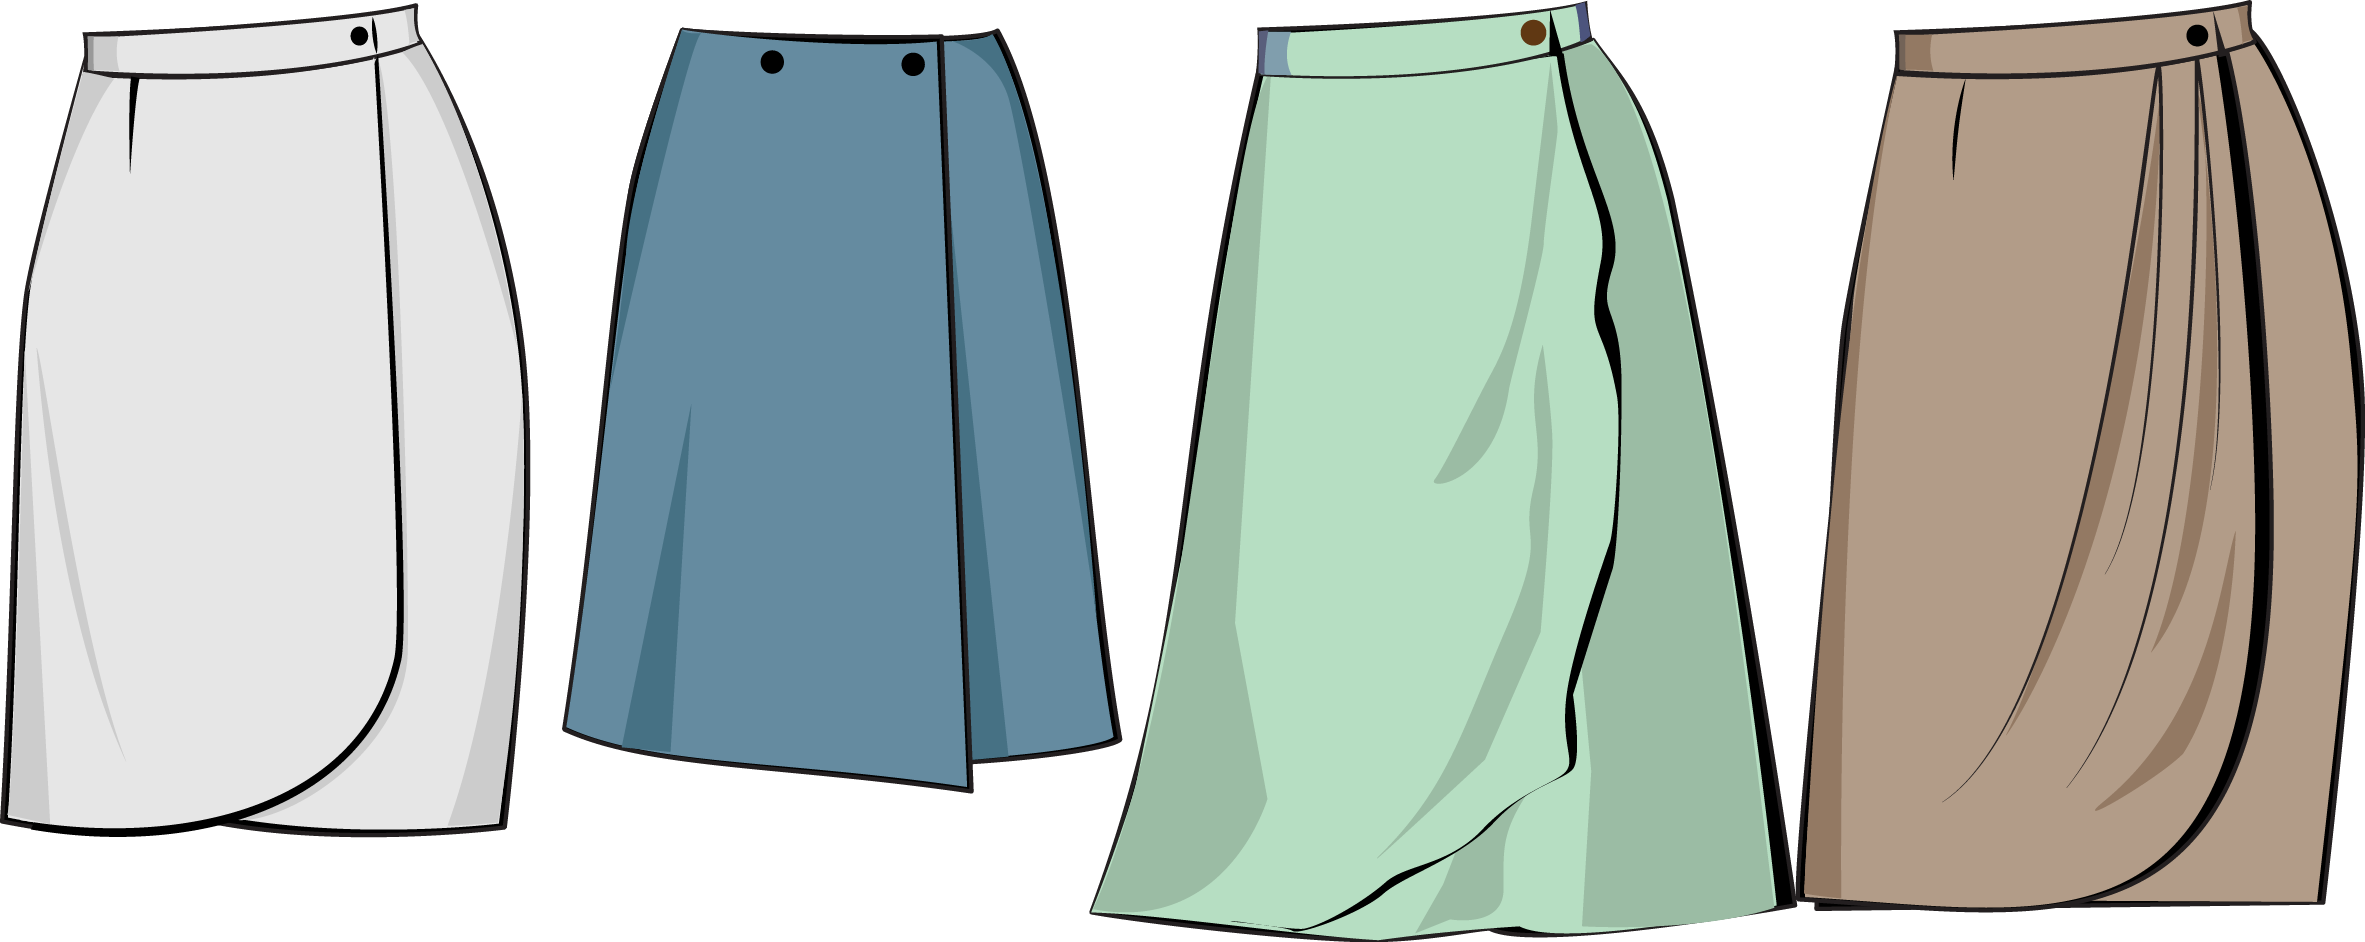
As for the skirt, some distinctive characteristics should be mentioned. Most often, one vent is used, located in the central seam of the back of the item. Less often, you can find skirts with a vent in the front. In this case, the location can be either the central or the relief seam. It is also possible to use two vents.


Basic pattern of a skirt with a slit
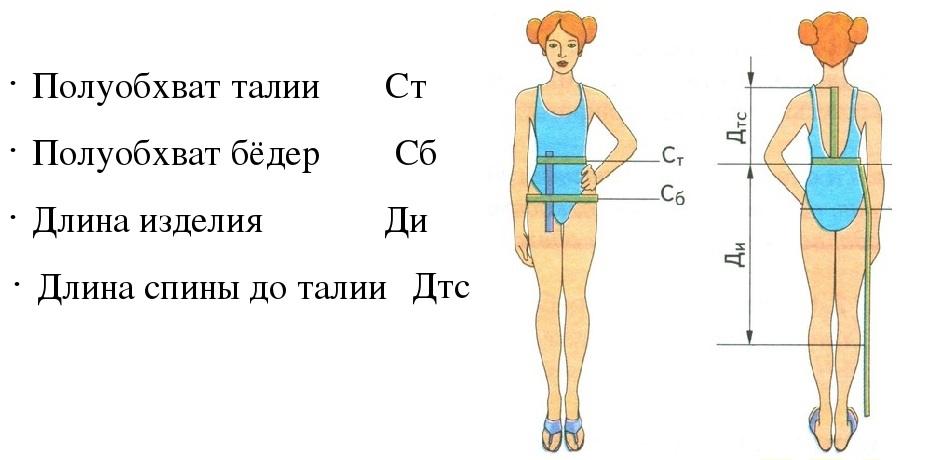
The slit is made mainly on products made of dense fabrics. Before constructing a pattern for a straight skirt with a slit, you should measure the length, as well as the waist and hip circumference in half. After taking measurements, the resulting figure should be divided by two. Then one centimeter is added to the values so that the skirt does not turn out tight. The length is measured from the waist to the desired point.
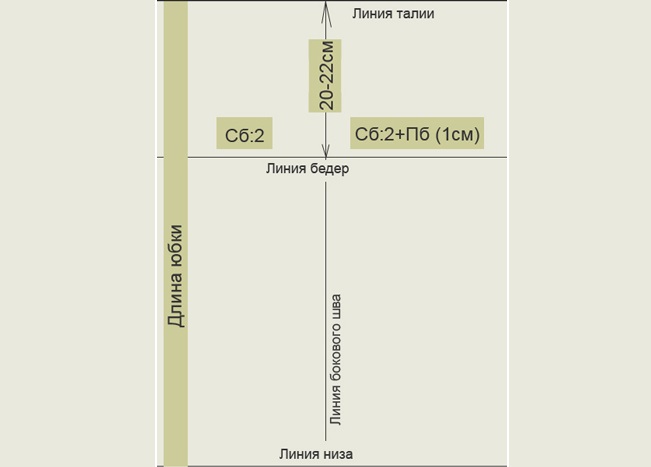
To create a pattern, beginners are advised to use special millimeter paper. Then the drawing will be as accurate as possible. The length of the product is applied vertically and half the hip circumference horizontally in two copies on the paper grid. One for the front part, the second for the back. An indent of 20-22 cm is made from the upper part of the resulting rectangles to determine the hip line. The basis of the template, depicting a straight skirt with a slit, is ready.
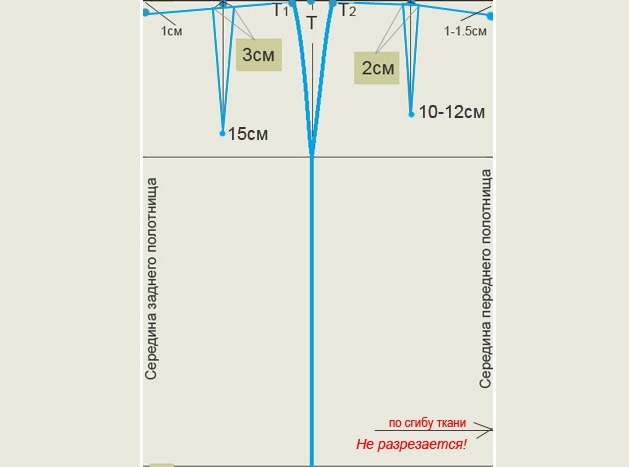
Next, the top point of the vertical line is designated by the letter T. The segments in both directions are divided in half and marked. Down from each point, darts are drawn in a vertical direction. For the front part, the length is about 15 cm and the width at the top is about 3 cm, for the back 10-12 cm and 2 cm, respectively.
The next step is to construct a beveled waistline. A smooth line is drawn from point T for the front part with a 1.5 cm drop, for the back part – 1 cm. Then a bevel is formed from the waist line to the hips. To do this, the sum of the half waist circumference and an increase of 1 cm is subtracted from half the hip circumference plus one centimeter. Then 5 cm (front plus back darts) are subtracted from the obtained result. The result is divided by two. The obtained value is set aside from point T in both directions and is designated T1, T2.
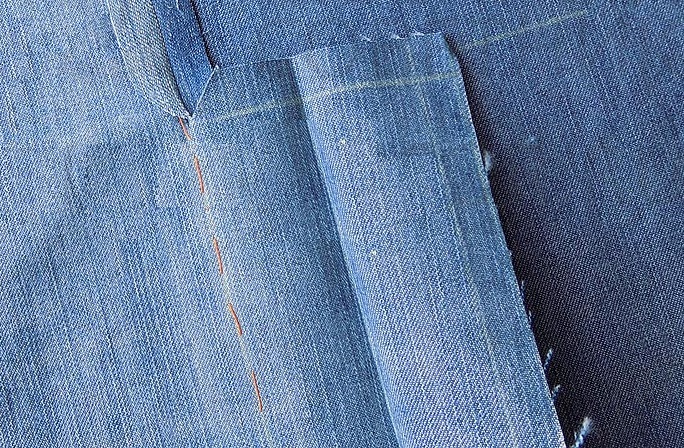
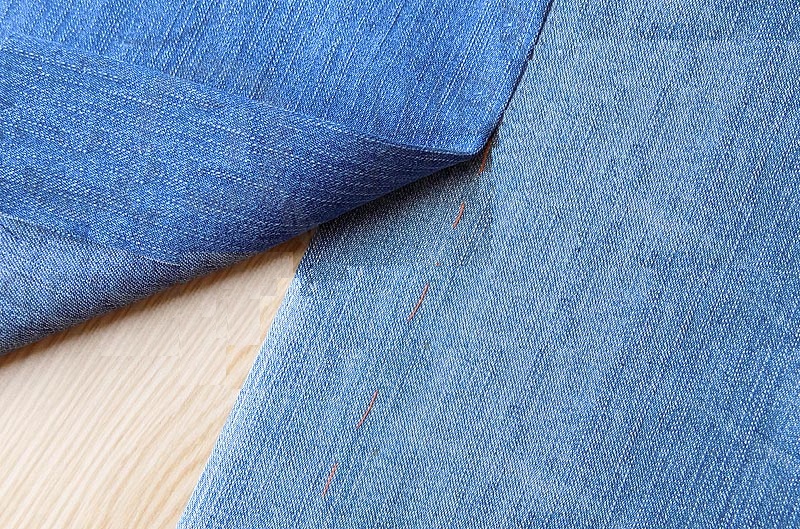
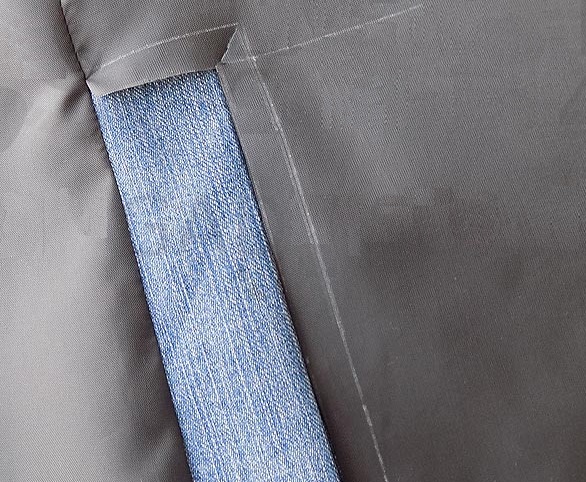
Finally, a slit is applied to the drawing. The location may vary: in front, on the side or at the back. The main thing is the presence of a seam that serves as the basis for creating a fold.
How to build a drawing of an element
To create a drawing of a slot, you should decide on some subtleties in advance. First of all, it is necessary to clearly indicate its location. One or two splines can be used. Their number affects the sewing of the product.
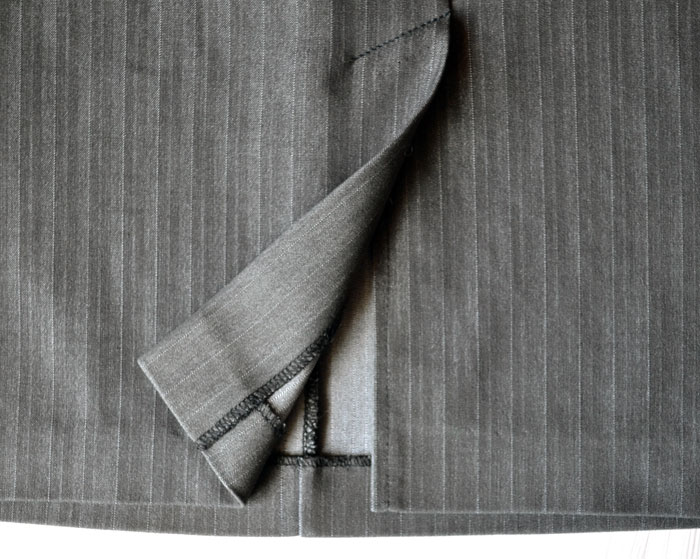
An important parameter is the depth of the element. It directly depends on the density of the fabric. For thin material - about 4-5 cm, for dense - 6-7 cm.
The depth of the front fold of the relief seam is created in the direction of the far side of the skirt. In the central seam, you can make a vent facing any direction. The direction does not play a special role. If two vents are planned, they are located symmetrically regardless of the place. From the front side, they are folds facing different directions. But from the back side, the depths of the folds are directed towards each other.
The next indicator is the length. The main condition is the obligatory distance from the upper edge of the fold to the hip line of at least 15 cm. On average, the height of the slit is about 22 cm. The longer the skirt, the longer the detail in question.
The necessary values are transferred to the pattern taking into account all the above conditions. In this case, hatching is used to mark the vent from the main template. Most professional seamstresses who know how to sew a vent on a skirt do not mark it on the pattern at all. However, novice seamstresses are advised not to neglect the preliminary image of the element.

Nuances of cutting out the product
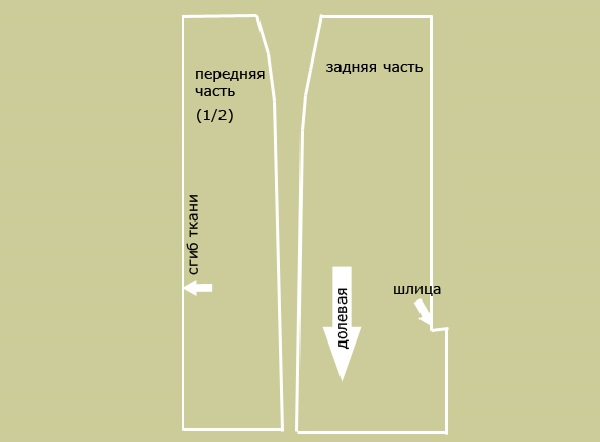
Cutting fabric for a skirt with a slit is carried out taking into account certain nuances. For beginners, it is recommended to first study the master class describing all the subtleties. First of all, you need to mark the front and back sides of the fabric. It should be remembered that the pattern is transferred to the back. Next, the fabric is laid out on a hard surface taking into account the direction of the grain line, along which the fabric is folded in half. The pattern is also taken into account.
For example, a pencil skirt pattern is placed on the fabric and pinned. The first outline is made strictly along the contour. Then 1-2 cm are added for seams and the second outline is drawn. After that, the pattern is cut out along the second contour line. It is important to remember that the pattern in the form of stripes and cells, if any, should match at the seams. And a large print should be placed in a visible area of the product.
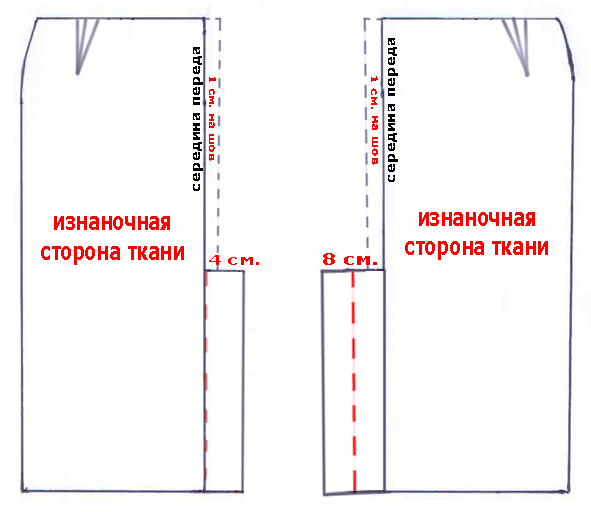
A slit not provided by the template can be drawn directly on the fabric. To do this, 5-7 cm in width and about 22-30 cm in height are added to the cuts of the planned location. In this case, the upper line is at an angle of 45°.
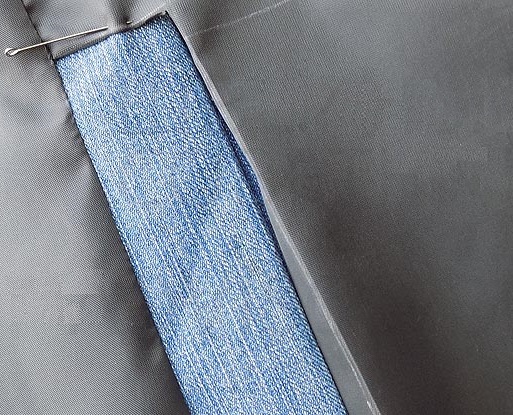
In order for the slit on the skirt to look decent and not come apart on the finished product, certain nuances should be taken into account. The depth at the bottom of the fold should be reduced by 1 cm relative to the original value. But at the top it should be increased by 0.5 cm. Only after this are seam allowances added.
Processing technology
The next stage of creating a straight skirt with a slit is the actual processing. There are two classic options, which differ in the presence or absence of a lining.
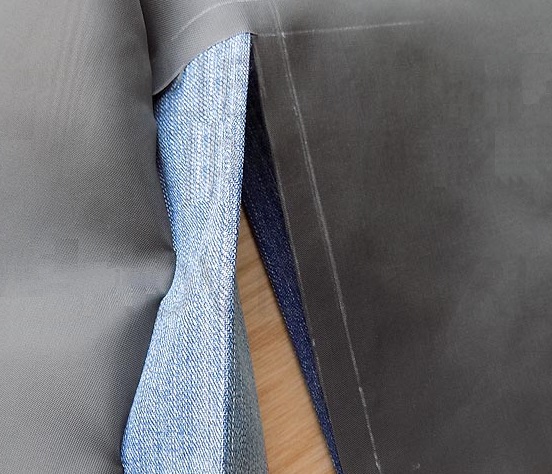
With lining
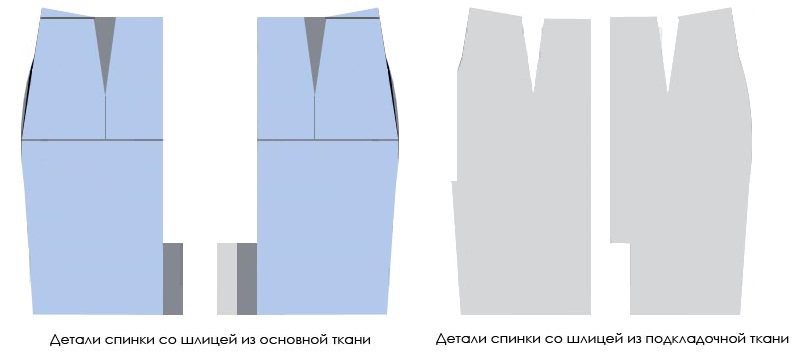
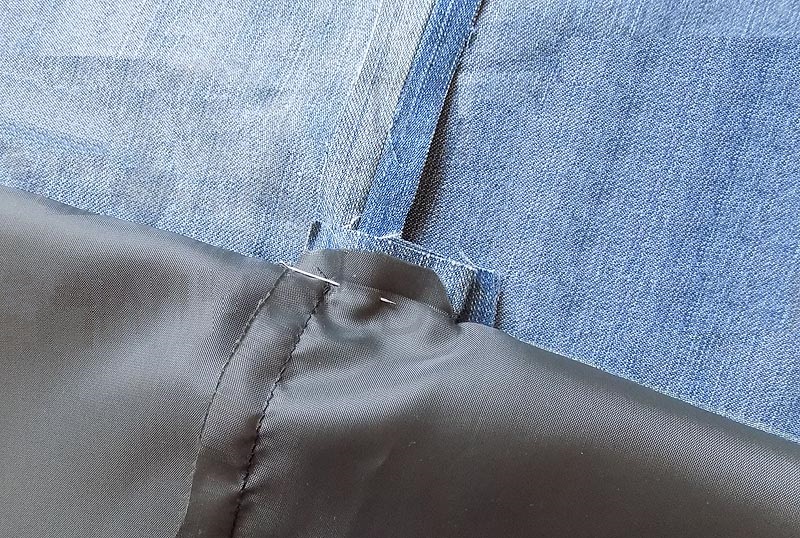
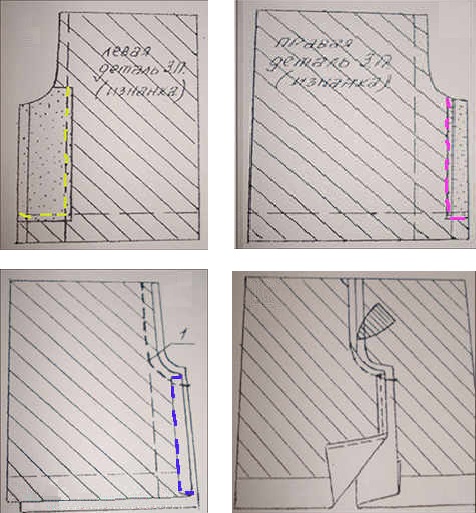
The instructions provided, which demonstrate the process of processing the vent on the skirt step by step, assume the presence of one fold in the middle seam of the back part:
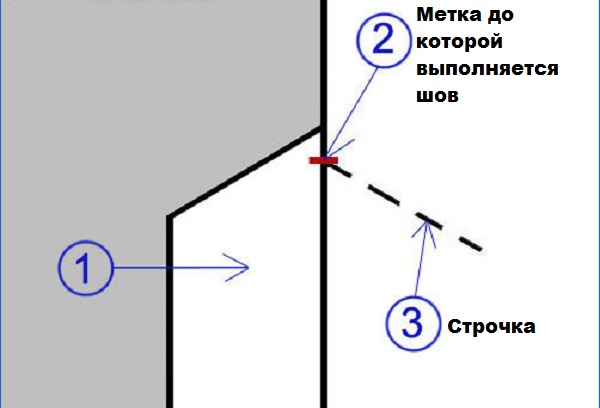
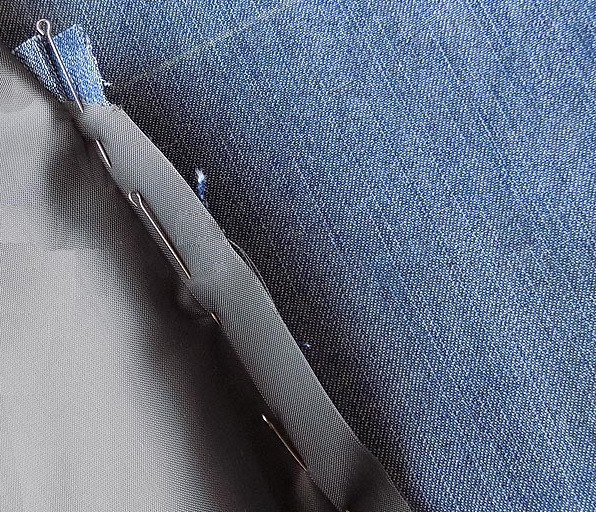
- First, the middle seams of the skirt itself and its lining are sewn down exactly to the marking of the slit location;
- using an iron, the seam allowances on the skirt are smoothed out, one of which is cut;
- the middle seam of the product is marked on the slit, helping to understand how to process the element correctly;
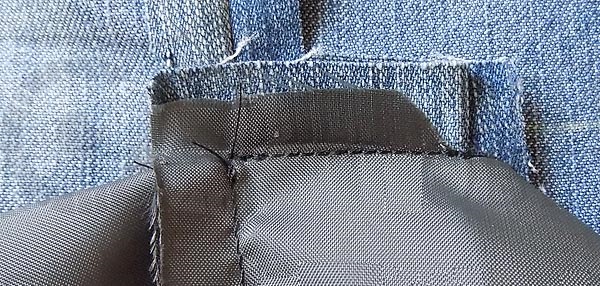
- the lining allowance is ironed evenly;
- the skirt and lining are joined together with the wrong sides together;
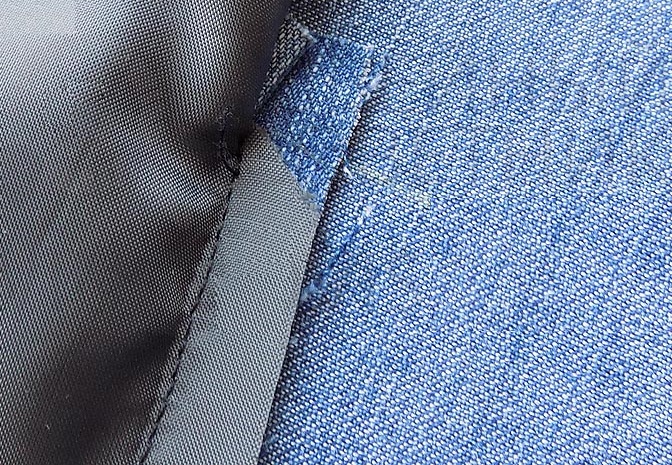
- the lining is folded back, its left seam allowance is stitched to the seam allowance of the slit;
- the corner of the allowance on the slit in the lining is notched, the upper part of the allowance is connected to the skirt;
- the right lining allowance is folded with the allowance for the hem of the slit;
- Next, you should stitch the slit up to the notch at the top;
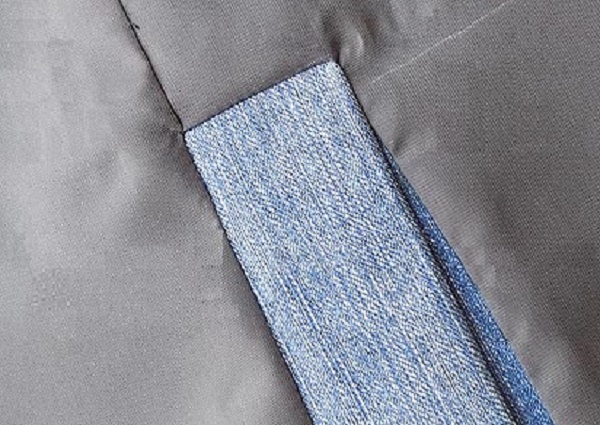
- the lining is folded down;
- the upper allowance is fixed with the skirt allowance;
- The lining and skirt allowances are joined with a seam up to the vertical line.
After all the procedures, it is recommended to lift the lining and iron all the seams. This is necessary to give the product a beautiful appearance. In addition, there will be no feeling of discomfort during wearing. The product with lining is ready.

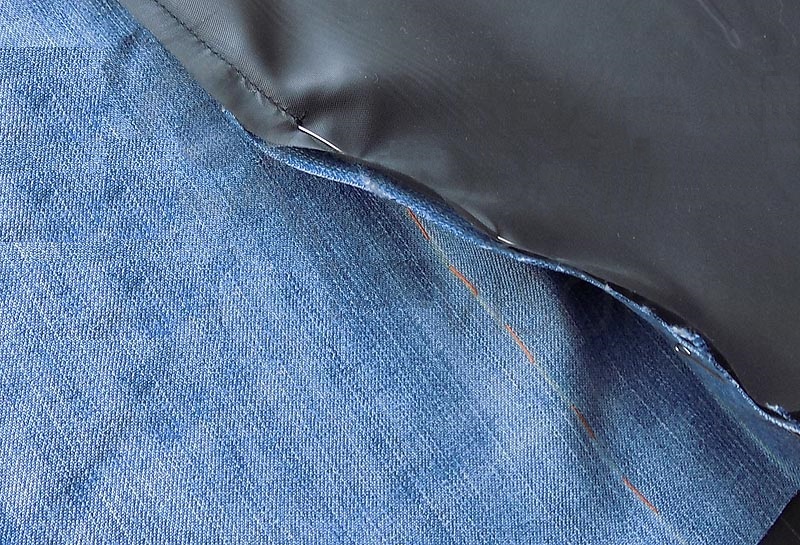
Unlined
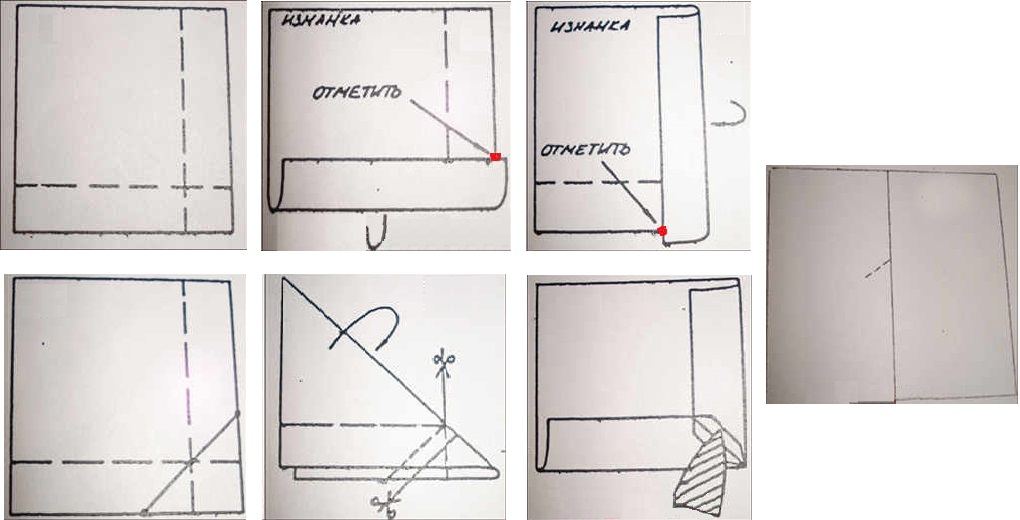
This step-by-step instruction for finishing the vent on an unlined skirt assumes the presence of one vent in the middle seam of the back of the skirt:
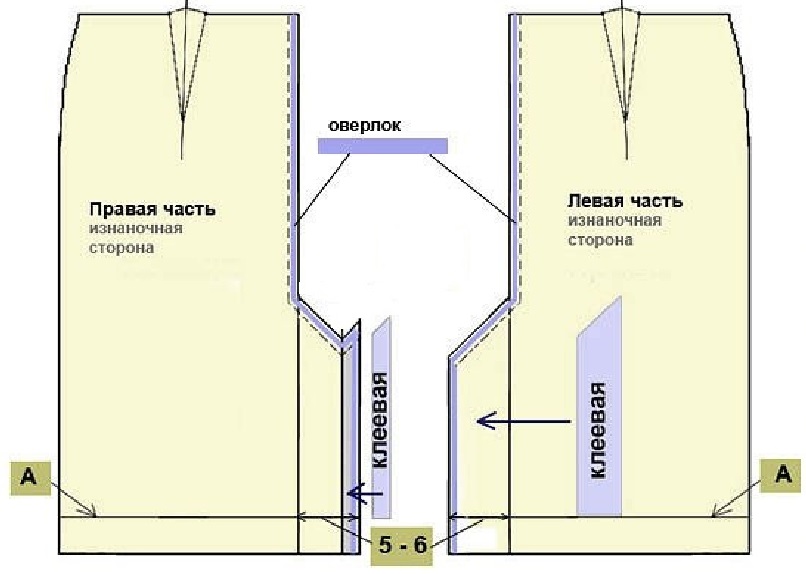
- when sewing such models, it is recommended to treat the slit with an adhesive pad, especially when using thin material;
- on one side of the skirt the slit itself is glued, and on the other side its allowance;
- allowances are ironed to the wrong side;
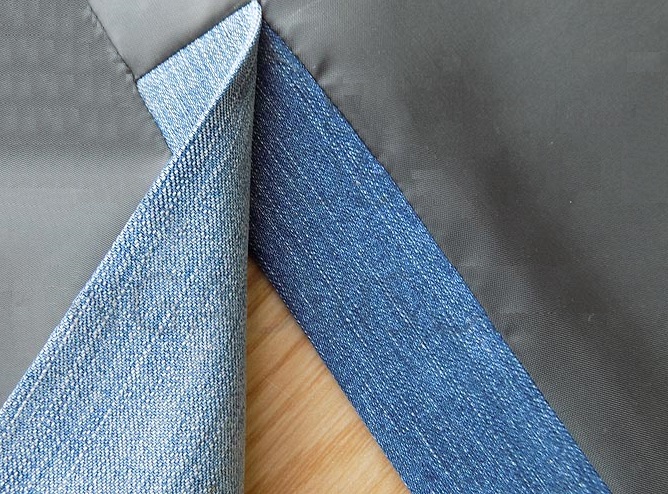
- The two parts of the skirt are folded with the right sides facing each other and sewn along the entire length of the middle seam, including the upper edge of the slit.
Finally, you should smooth out the allowances. Do the same with the slit, while taking into account the direction - to the left side of the product. All that remains is to fold the bottom.
Bottom hem rules
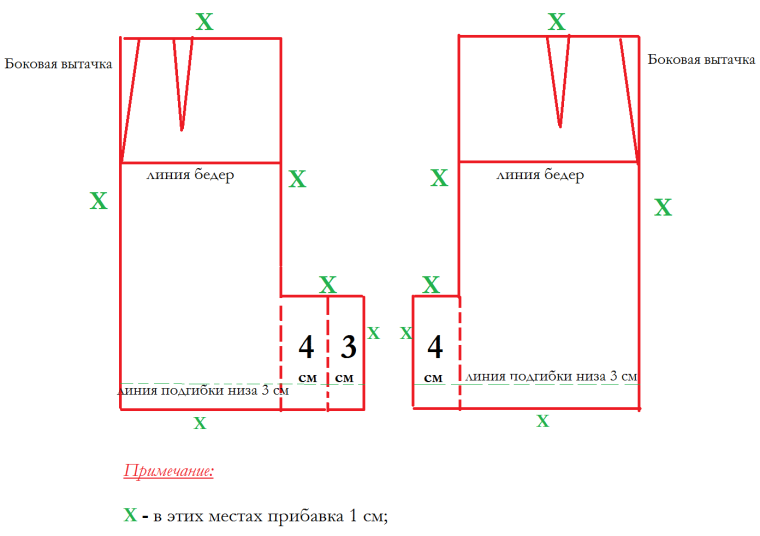
The stage of hemming the bottom of the skirt is considered to be the final one. It is started after all other work processes are completed, when the seams are already stitched, the zipper is inserted, and the belt is created.
As a rule, 2-3 cm are allocated for the seam allowance. The entire bottom edge of the skirt is folded inward and ironed. After this, the seam allowance of the right component of the vent is folded to the front side of the product, stitched on the side at a distance of 2-3 mm from the edge. The vent is turned inside out, the seam is inside, and a cleanly formed corner is obtained.
The bottom of the left part is designed with an envelope corner. The finishing line runs at an angle of 45 degrees across the entire width of the slit, fixing the allowances from the inside and securing the upper parts. After this, the bottom of the entire skirt should be hemmed. There are several options: using a spider web, using adhesive tape, manually. The skirt with a slit is ready.
Video