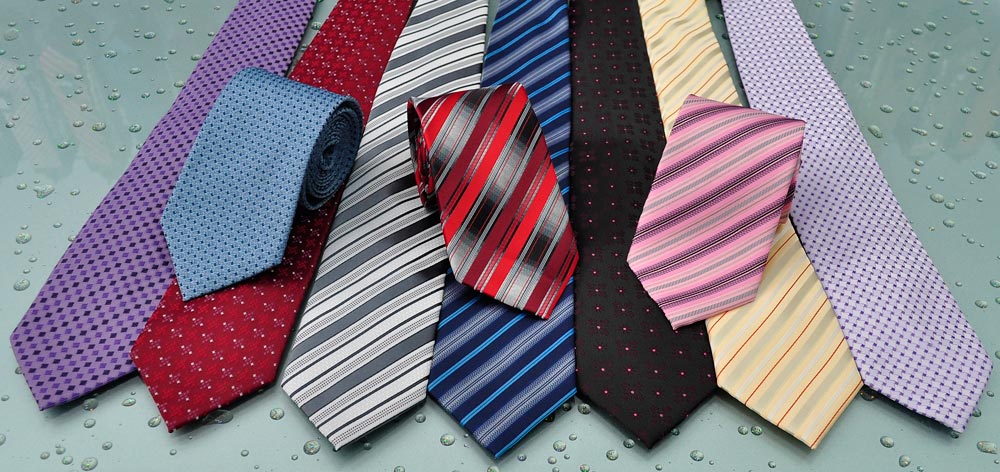
A well-chosen and perfectly tied tie can tell about a person no less than expensive shoes or a watch. Although this small strip of fabric has no practical use, does not protect from the cold, and sometimes even gets in the way, it is impossible to imagine a business person in a formal setting without it. It may seem that information on how to choose the material and color of an accessory, how to tie a tie, which models are appropriate in a particular case, will be useful for young people who are just mastering this science. In fact, self-confident "veterans" of fashion and style will also benefit from remembering all the nuances of this process.
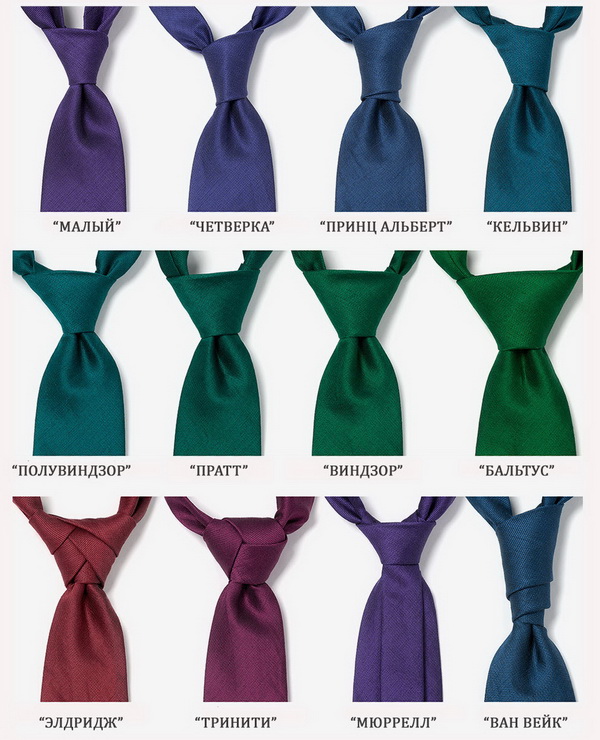
Types of nodes
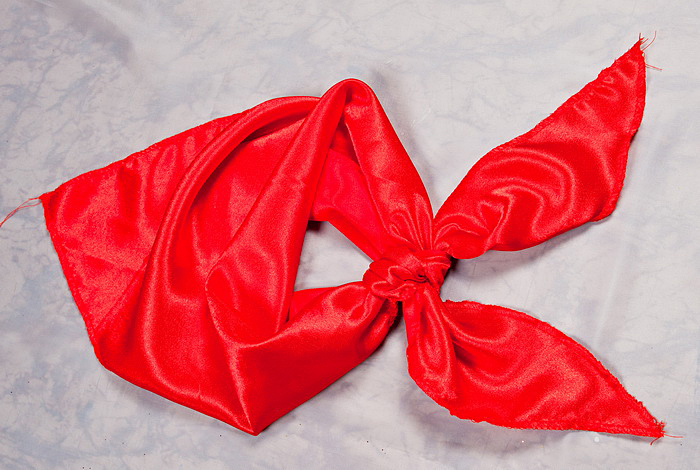
The first prototypes of a tie in observable history were found on the statues of nobles of the famous Terracotta Army in the tomb of the Chinese emperor. In European fashion, this item of men's clothing settled during the Thirty Years' War at the instigation of the French king Louis XIV. In Rus', a neck scarf with long ends was introduced by Peter I, an admirer of the Western lifestyle. At the beginning of the last century, the tie became a mandatory accessory of business etiquette.
The choice of color, width, length depends on several factors:
- a large man will suit wide models with a large knot, a slender man - medium width or neat narrow ones;
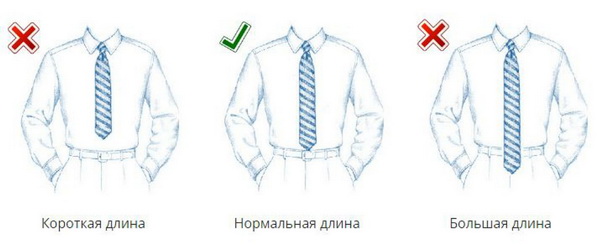
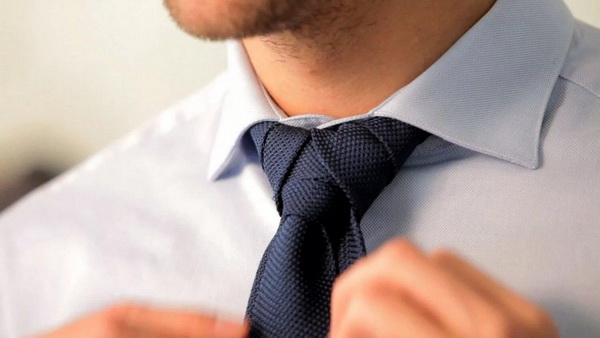
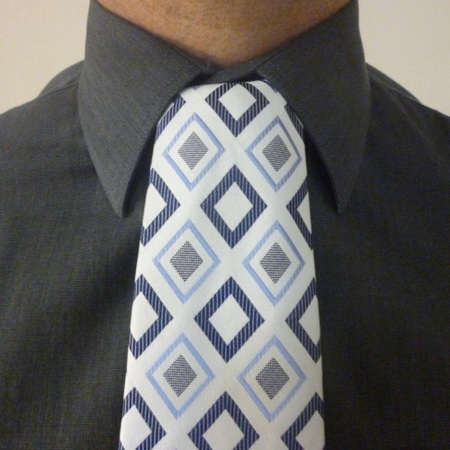
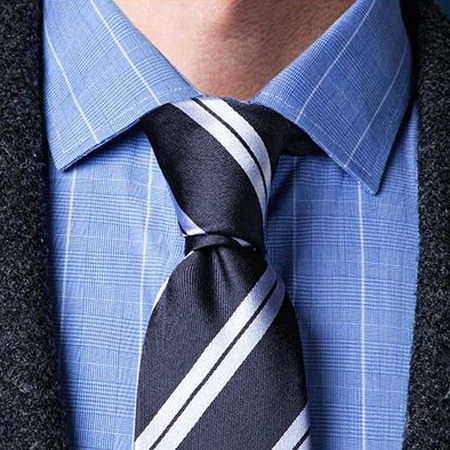
- A perfectly tied tie should have its bottom part covering the belt buckle (the widest part is level with its top edge);
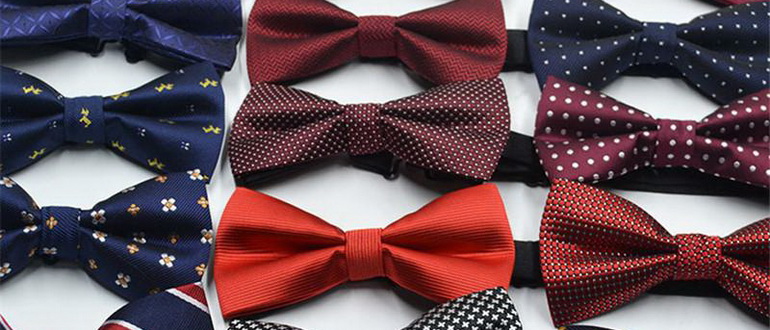
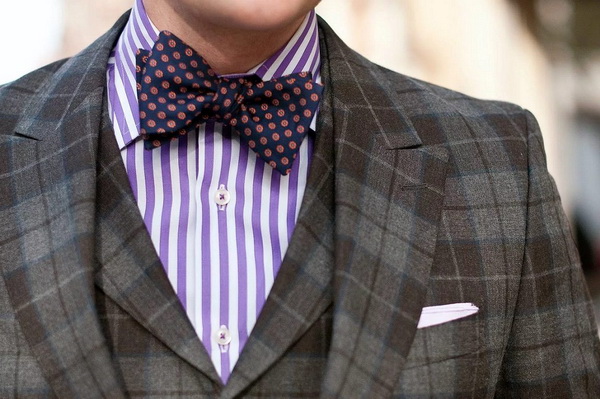
- a tuxedo requires only a bow tie (black for conservative men, colored for the bold);
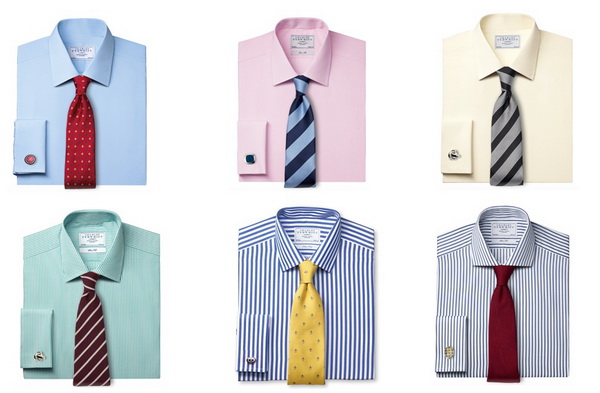
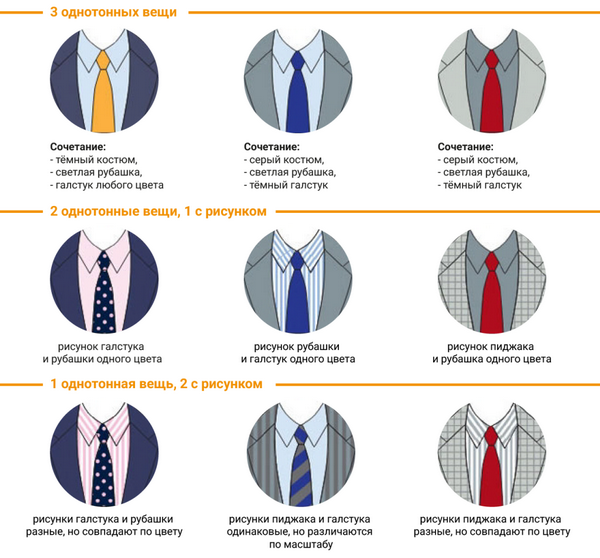
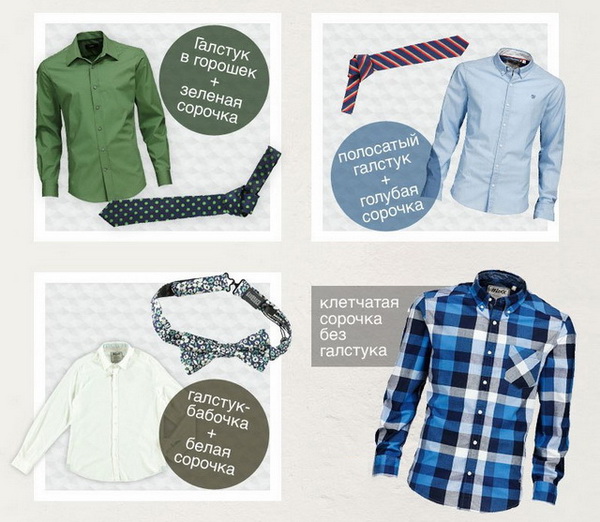
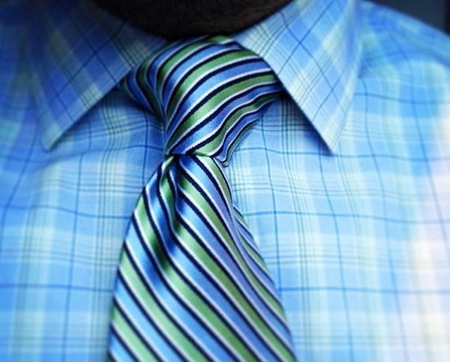
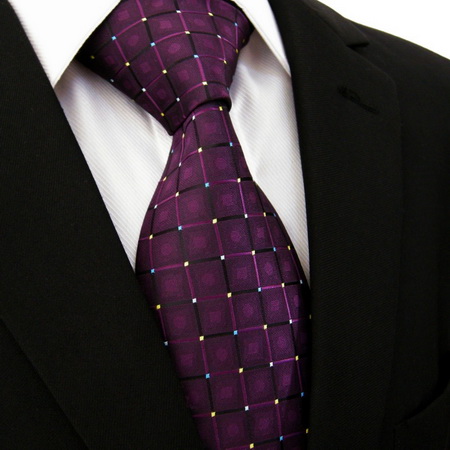
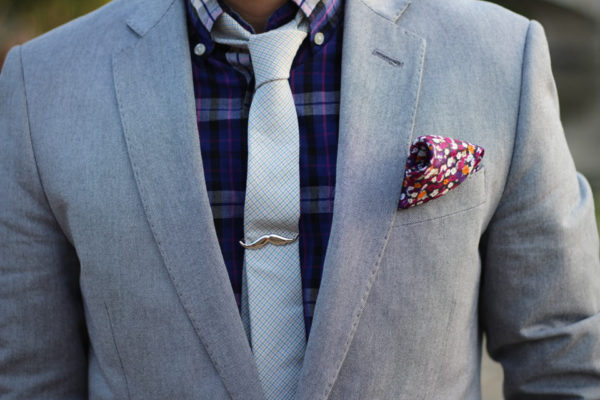
- Patterned models are worn with a plain shirt and vice versa;
- In formal settings, etiquette dictates the use of dark-colored accessories (darker than the suit).
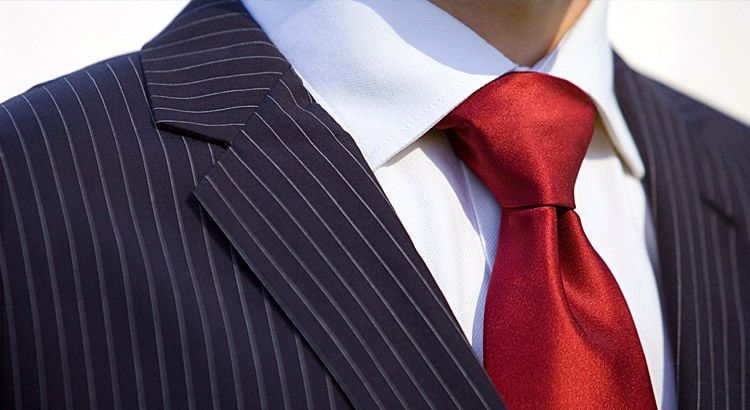
It is not enough to choose the right color and length, you should also know how to tie a tie quickly, correctly and truly stylishly. Only if all these conditions are met will it be an effective decoration of a man's image. For example, a knitted or crocheted tie is recommended to be tied with a small oriental knot. Models made of thin silk look more original with a double knot, and for short items, the "Shelby" is ideal. Over the past centuries, mankind has invented a huge number of beautiful, simple and intricate, but always effective ways to tie a tie.
Simple
Simple, also known as Italian, also known as quarter knot, is perhaps the most popular, classic way to tie a tie. It cannot be said that this is an exclusively male option, because it is often used by business ladies in combination with a strict blouse and skirt.
Pros:
- the conical shape looks neat and thin;
- slight asymmetry adds a stylish casualness to the image;
- ease of execution.
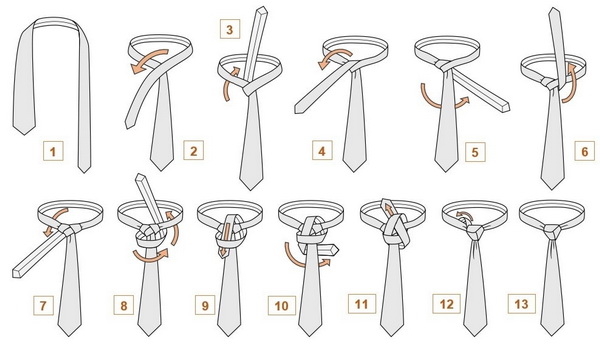
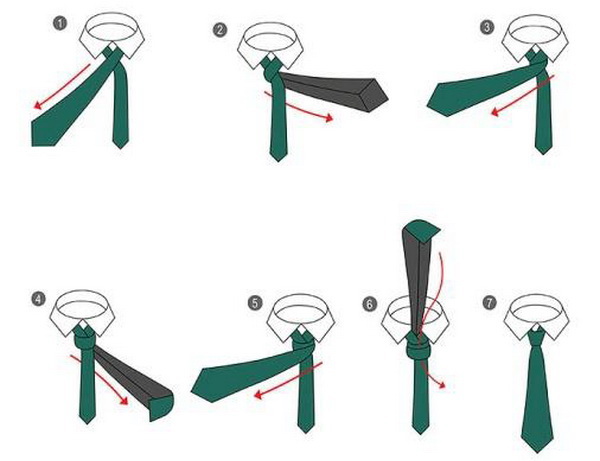
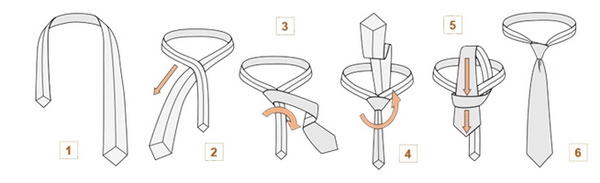
How to tie a tie the classic way:
- Turn it over to the front side, leaving the wide end on the left, it should be a little longer.
- Cross the sides. Pass the large edge from top to right.
- Under the narrow end, pull the opposite edge to the left. Then place it horizontally on top so that the edge faces to the right.
- Pull from the inside through the collar loop upwards.
- Place the wide edge into the resulting loop. Pull it up and straighten it out.
This is the easiest way, it does not require much effort and time. It is ideal for those who are trying to learn how to tie a tie. This knot looks equally good on collars of any style. It is suitable for wide ties of any length, color and material.
According to one version, the name “quarter” was borrowed from the knot used to tie the reins of horses harnessed to four carriages.


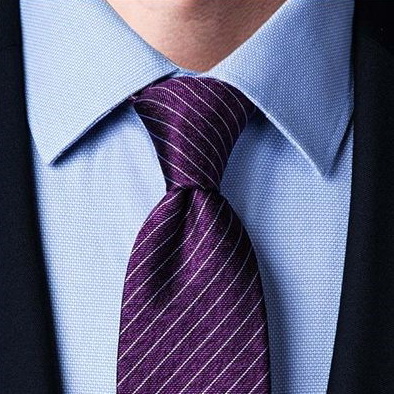
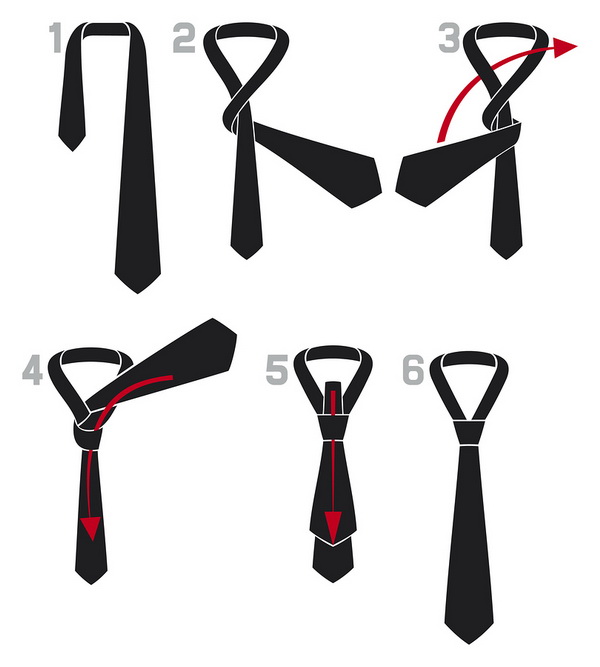
Kent
This is also an easy way to tie a tie beautifully. Experts say that the "Kent" is even easier to do than the quarter knot. The knot is slightly asymmetrical, easy to do, but difficult to untie. Suitable for narrow ties and the same collars. Sequence of actions:
- Turn the garment with the seams facing outwards. Leave the narrow edge on the left and lower it to about the level of the navel.
- Overlap the sides, leaving a wide one at the bottom.
- Wrap the narrow edge with a wide movement to the right.
- Pull up into the space between the tie and the collar.
- Direct it into the loop obtained during the turn and pull it up.
Pros: allows tall men to wear a short tie, masking the lack of its length. Cons: it is recommended to use models made of thick, dense fabric so that the simple knot looks more impressive.

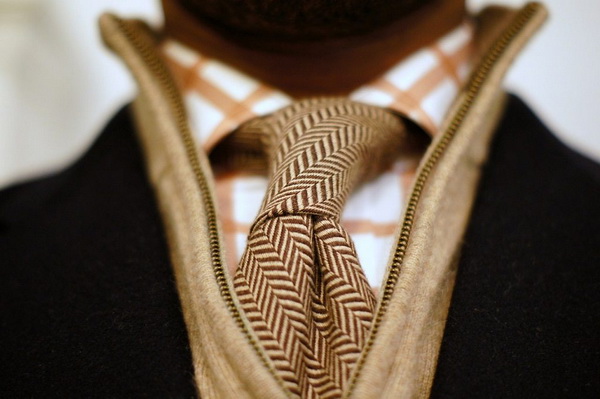
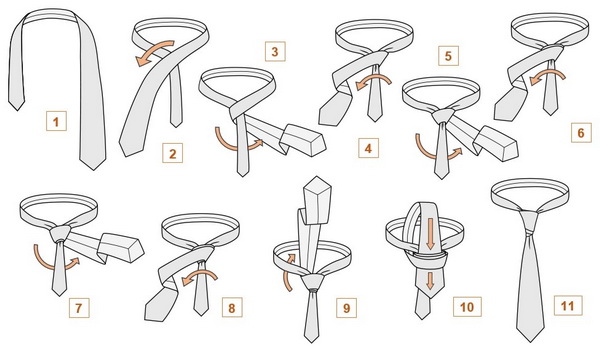
Nicky
"Nicky" (Nicky, "Olney", "Free American", new-classic) became famous thanks to Ernesto Kurami. His factory produced ties called "Nicky". A beautiful knot, resembling an elongated triangle, in complexity is between a simple classic and a half-Windsor.
How to do the job:
- Place the tie inside out, with the large edge on the left and below.
- Overlap the edges. Wide over narrow.
- Raise the larger edge up to the place of future interlacing. Pull it through the collar loop down, take it a little to the left.
- Wrap the knot with the wide edge. Point it upwards. Do not tighten too much.
- Pull through the resulting loop.
- Pull up.
"Nicky" is ideal for long ties made of textured material of medium density with a pattern. It goes well with collars "Kent", "Batten-down" and "Vario".

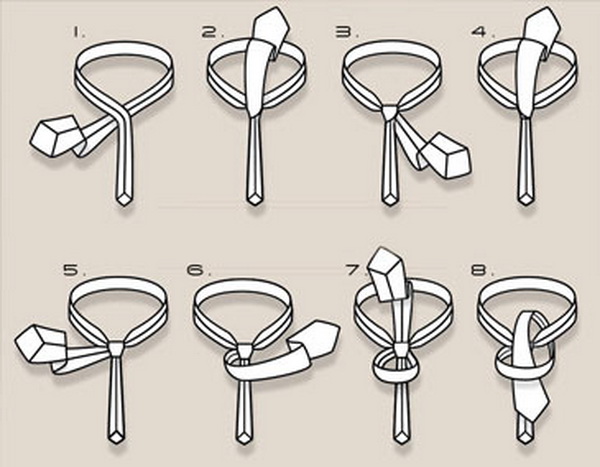
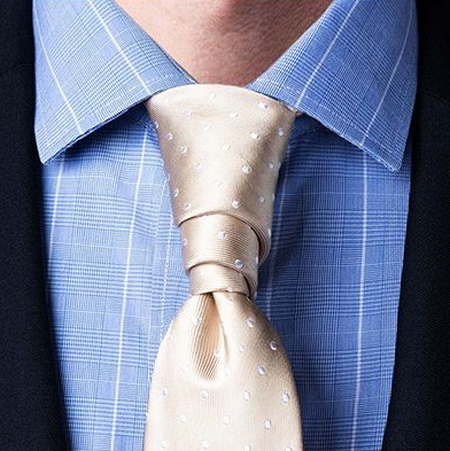
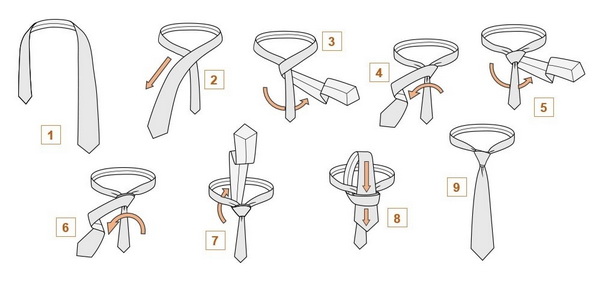
Pratt
"Pratt" (Shelby, American) was invented by American Chamber of Commerce employee Jerry Pratt.
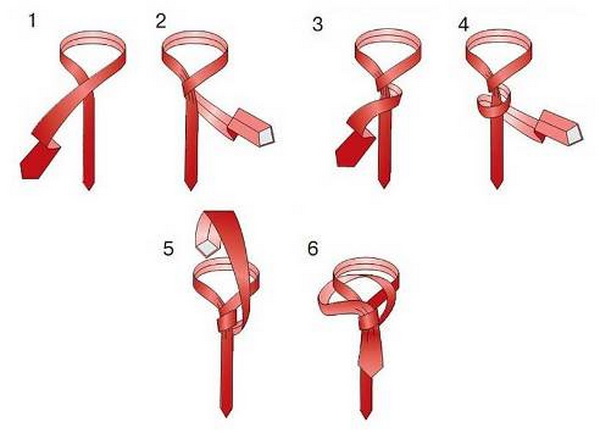
Knitting pattern:
- Place on the neck with the wrong side up. Leave the tip of the narrow edge on the left, approximately level with the navel.
- Overlap the edges so that the larger one remains at the bottom.
- Pull it up and pass it through the collar loop.
- Wrap the knot from right to left. Do not tighten too much.
- Pull it up through the neck loop and then direct it into the gap created by the previous turn.
- Pull up.
This knot is recommended for classic collars and models with rounded corners. Suitable for everyday use and special occasions. Suitable for short ties.

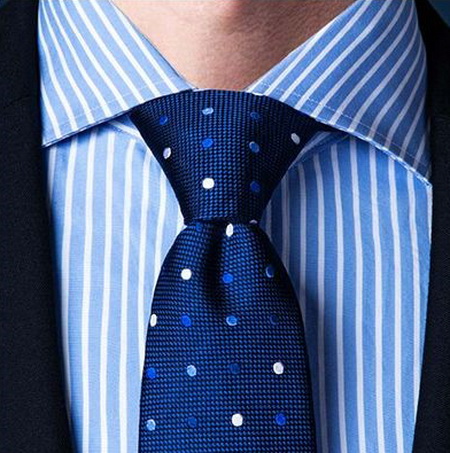
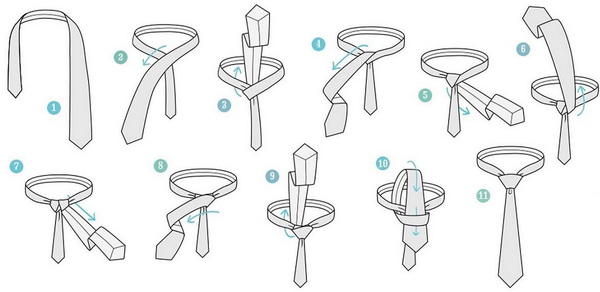
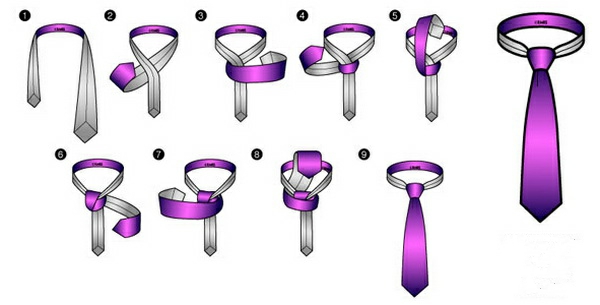
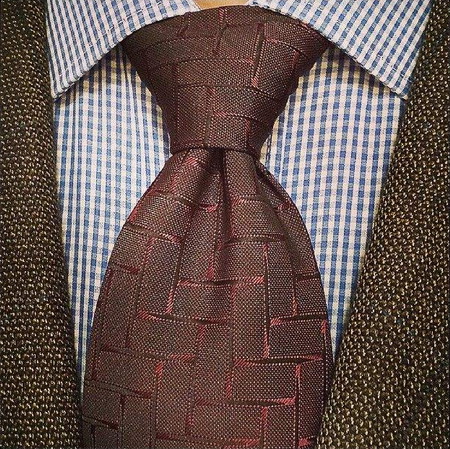
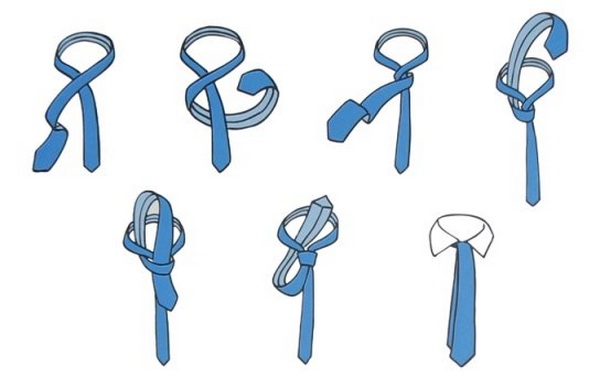
Windsor
The knot is named after the Duke of Windsor, a big fan of this method of tying. Pros: symmetrical and voluminous "Windsor" is ideal for formal events, it is spacious enough, allows you to loosen the accessory, even take it off without untying it. Cons: to get a beautiful weave, you will need a long tie, 4 cm longer than usual.
Work with Windsor begins with the product placed face out:
- Place around the neck. The narrow edge is just above the navel.
- Overlap the sides. Leave the wide one on top.
- Pull the wide end up through the loop around the neck.
- Pull it down to the left, wrap it diagonally around the knot, and pull the edge from the bottom to the left.
- Raise the edge up, cover the weave with it, and pull it through the collar loop to the right.
- Place horizontally over diagonal crosses. Do not tighten too much.
- Pull through the collar loop, pass over the weave, pull through the loop obtained during the previous turn.
- Pull up.
"Windsor" is suitable for shirts with a wide or medium collar and soft corners.
The "half Windsor" is much easier to tie. The English, who highly value the slight carelessness of the style, joke: "Why do you need a full Windsor if you have its "younger brother"?!" The "half Windsor" remains formal enough for official events, but looks more elegant due to its slight asymmetry and smaller volume. It is suitable for wide collars and models with soft corners.
The "Double Windsor" has nothing to do with the Duke of Windsor or the Windsor knot itself. It is suitable for shirts with very wide collars. If you tie a tie with a double knot under a standard collar, its width and considerable volume will raise the ends of the collar high.
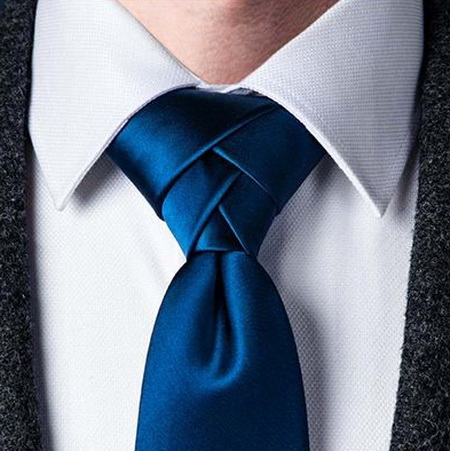
Eldridge
To create this "work of art" you will need as many as 15 steps. "Eldridge" is one of the most unusual and "young" types of tie knots. It was invented by Jeffrey Eldridge in 2007. He decided to braid the tie, similar to how they braid hair. "Eldridge" is quite voluminous (larger than "Windsor"), can unravel at the most inopportune time, requires constant attention. However, the spectacular creation in the form of an ear of corn will definitely attract attention and make you stand out from the crowd.
The Eldridge is tied from the narrow end:
- Place the tie on your neck, face up. Immediately lower the large end to the desired length.
- Connect the ends crosswise, leaving the narrow edge on top.
- Wrap the narrow edge around the middle of the weave. Bring it out from the bottom to the left.
- Lift the narrow edge up, tightening the weave.
- Wrap the weave diagonally, that is, thread the edge through the gap so that it covers half of the existing knot.
- Loosely wrap the narrow edge from right to left. Pull it through the collar loop from below and bring it to the center.
- Drop through the top of the weave, forming a diagonal to the right. Wrap the knot from the bottom, from right to left. Do not tighten tightly.
- Pull the narrow edge diagonally up and to the right through the loop obtained during the last turn.
- Tighten the resulting braid into a braid.
- Twist the free part of the narrow edge from top to bottom around the collar loop to the right of the knot.
- Pull the edge up diagonally from right to left. Tuck into the collar loop to the left of the knot.
- Pull the edge under the loop. Pull it through the loop formed after the previous step with an upward and to the right movement.
- Pull up the next turn of the "spikelet".
- Tuck the remaining narrow edge behind the collar (models with buttons on the corners are preferable).
- Straighten to create symmetrical coils.
The Eldridge is suitable for shirts with medium and large collars, with buttons at the ends of the collar or options with soft corners. For this method, it is better to choose a solid-color tie of medium length.
Cross
The cross (square) or "Christensen" knot is named after a woman. Businesswoman Amanda Christensen of the early last century published a fashion catalog with product samples, in which she "christened" the newly appeared knot with her name. Externally, the "Christensen" slightly resembles a cross weave, originally used for wide ties with edges of the same width.
Tying step by step:
- Put the tie on with the right side facing out.
- Connect the edges crosswise, leaving the wide one on top.
- Wrap the wide edge around the vertically positioned narrow edge. Lift it up and lower it into the collar loop. The wrong side will be on top.
- Direct in front of the knot horizontally with a movement to the right. Fold over the right side and pull through the collar loop from below. Do not tighten too much.
- Lower the wide edge into the loop created during the last turn.
- Straighten out the folds. Tighten.
"Christensen" is ideal for wide collars, narrow ties of medium thickness or models made of heavy fabric. Visually reduces a neck that is too large.
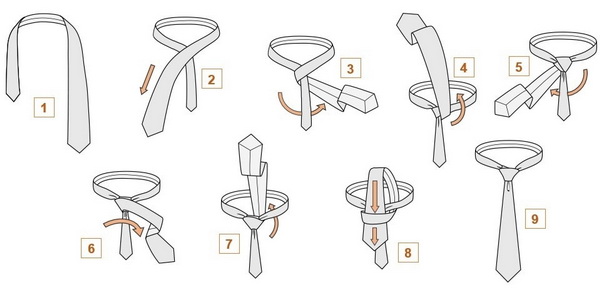
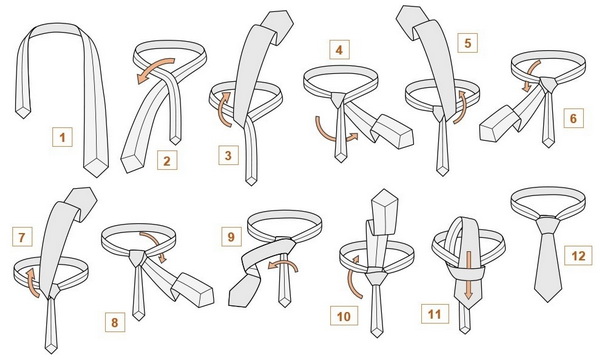
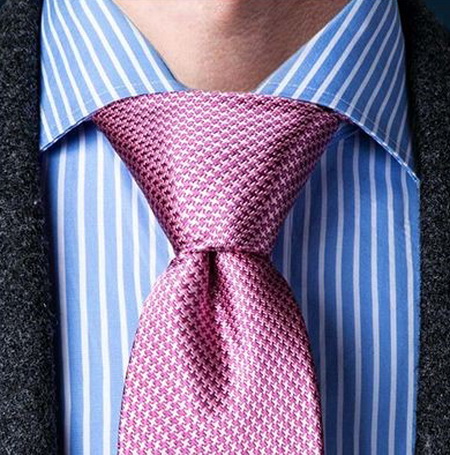
Trinity
This is another unusual knot, invented relatively recently. Externally, the Trinity resembles the ancient sacred ornament triquetra. The peculiarity is that when tying, they work only with the narrow end, leaving the wide one at the level of the belt buckle or slightly lower.
How to tie a tie step by step:
- Immediately pull the large end to the desired length (the widest point at the level of the upper edge of the belt buckle).
- Wrap the narrow edge around the wide one. Pass it through the collar loop from below.
- Direct diagonally down to the right. Pass horizontally under the weave to the left side.
- Move up diagonally to the right. Pull through the collar loop from above, move to the right.
- Pull horizontally slightly below the weave. Wrap around the knot, pull the edge up through the collar loop. Do not tighten too much.
- Lower the narrow edge into the gap created by the last turn. Do not tighten the weave.
- Pass the narrow end under the knot horizontally from right to left. The loop remains free.
- Insert the narrow edge up and to the right into the resulting loop. Carefully hide the remaining part under the shirt collar.
"Trinity" is quite large, larger than "Windsor", has a slight asymmetry. Pros: unusual, attracts attention, allows you to stand out from the crowd, fits any tie. Cons: it will take time and persistence to cope with the complex tying technique.
"Trinity" can be tied under a collar of medium and large width, "Shark" style (narrow long corners) and models with buttons along the edges.

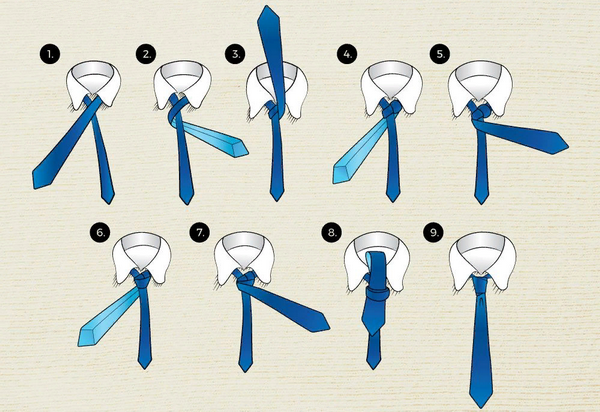
St. Andrew
The St. Andrew knot is slightly asymmetrical. When pulled tight, it lifts the tie. This gives extra volume and allows the accessory to hang freely. The knot was named after the Apostle Andrew, who was crucified on an X-shaped cross.
Step-by-step instructions for making the St. Andrew knot:
- Turn it inside out. Cross the edges, leaving the narrow one on top.
- Wrap the narrow edge with the wide one. Leave the loop free.
- Pull the wide end diagonally up and down into the neck loop in the opposite direction.
- Wrap the knot from the front side in a horizontal direction. Take the wide end down, pull it up through the neck loop.
- Lower and pull through the loop created during the previous turn.
- Pull up.
"St. Andrew" is recommended for shirts with "Tab", "Kent" and "Batten-down" collars. Suitable for thin ties made of lightweight fabrics.
Balthus
This is the largest and most difficult of all knots. It will take practice and patience to get a good result. Pro: due to the fact that the knot hides the length of the tie, it is ideal for short men. Cons: it does not fit all models. It is best to make this knot on light, silk ties.
How to tie a Balthus:
- Turn the tie around your neck with the front side facing up. Cross the sides so that the wide side is at the bottom.
- Raise the wide end up. Direct it into the neck loop to the left.
- Lift up without closing the narrow edge. Bring to the right, lower into the neck loop.
- Wrap the weave horizontally with the wide edge on the front side. Then through the neck loop to the right.
- Wrap the knot from the front side horizontally in the opposite direction. Pass it up through the neck loop. Leave the weave loose.
- Lower the wide edge into the loop that appeared during the last turn.
- Tighten your tie.
"Balthus" is suitable for shirts with collars of the "Kent", "Shark" and "Vario" styles.
Plattsburgh
This is a symmetrical knot that resembles an inverted cone with a large base. It is named after the famous city where the inventor of this tying method was born - Thomas Fink. Pros: suitable for slightly worn ties. Cons: does not unravel. The knot is made as follows:
- Turn the product right side up. Cross the ends, narrow one on top.
- Bring the wide edge up with the right side facing out. Pass it through the collar loop diagonally to the right.
- Wrap the knot diagonally in the opposite direction. Pass the edge from above through the collar loop.
- Wrap the knot from the front horizontally. Take the edge under the collar loop, pull it from the bottom up.
- Pull through the resulting loop. Tighten.
Plattsburgh is recommended for light materials and wide collars.
Victorian
The knot is similar to the quarter knot with an extra turn. The idea is that the end is wrapped around the knot four times, only then tucked in. Despite some asymmetry and greater width, the Victorian weave looks conservative enough for the office.
The Victorian or "Victoria" knot is a bit like a simple knot in appearance. The difference is in the extra volume that is obtained by wrapping it around the loop twice. It is done like this:
- Turn the tie right side out. Cross the edges, leaving the wide one on top.
- Wrap the wide end around the narrow end, pass it horizontally from below. Finish the turn by placing the edge on top of the future knot.
- Repeat the previous step - make a full turn.
- Pull the wide edge from the bottom through the collar loop. Tuck it into the top loop obtained during the previous turns.
- Tighten your tie.
"Victoria" looks good on models made of thin material. The knot is recommended for shirts with collars of the "Kent", "Shark", and "Batten-down" styles.
Diagonal
The diagonal knot (Mosconi) is considered the most exotic knot. It is so complex that not even every professional can tie it beautifully:
- Turn the tie face up. Cross it, wide end on top.
- Draw it from the bottom horizontally. Make a full turn around the narrow edge.
- Pass through the collar loop from above, move the end to the left.
- Pass through the resulting loop. Form a knot, gradually tightening and turning the weave.
A poorly made Mosconi will ruin the most elegant look. Pairs well with a richly colored tie made of wool or cashmere. A suitable collar is a Kent or Tab.

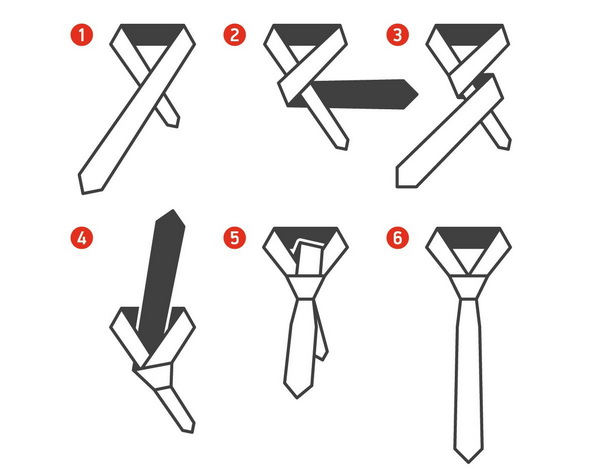
Onassis
The knot is named after its inventor, shipping magnate Aristotle Onassis. It is a variation of the simple knot, but it looks more eccentric.
To tie a tie correctly, you should:
- Turn the product right side out. Cross the wide edge over the narrow one.
- Pass the wide side underneath. Wrap around the place of the future knot horizontally.
- Pull the wide end from the bottom up through the collar loop. Lower it into the gap formed during the turn.
- Adjust the knot, tighten it.
- Take the wide end to the right, pull it under the finished knot and direct it to the front side, leaving it hanging freely.
Minus: not suitable for business clothes. Plus: will allow you to stand out from the crowd. Suitable for light, single-color ties and collars with widely spaced corners.
Hanover
This is a symmetrical triangular weave of quite a large size. It is named after the Hanover family. The method is recommended for shirts with a collar with a wide neckline, since too close collar edges will partially cover the weave, and the collar itself will rise unattractively. It is perfect for people of short stature.
Weaving order:
- Turn the tie inside out. Place the narrow edge on top of the wide edge.
- Pass the wide end over the narrow end horizontally. Pull it up through the collar loop.
- Direct downwards diagonally in the opposite direction. Pull under the knot.
- Point upwards and pull through the collar loop diagonally in the opposite direction.
- Wrap around the weave. Pass up through the collar loop.
- Direct the wide end into the loop obtained during the previous turn.
- Correct, tighten.
"Hanover" is suitable for shirts with collars of the "Kent", "Vario", "Shark" type. The fabric of the tie should be light.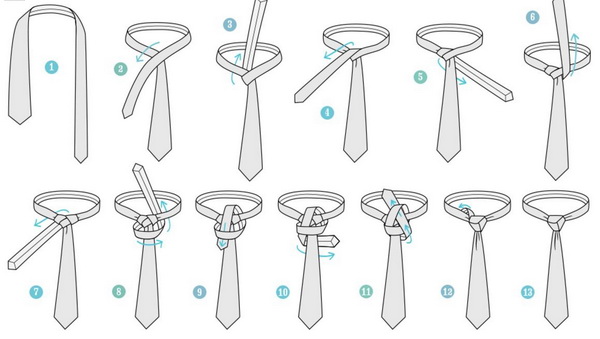
Oriental
Eastern (Asian, small, red) or Oriental can be used for any ties and collars. First mentioned by Fink and Mao. This is a rather complicated way to tie a tie, it will require persistence and training, but the result is worth it.
Work order:
- Turn the tie inside out. Cross the edges so that the wide one remains at the bottom.
- Wrap the narrow side around the wide side horizontally.
- Pull through the collar loop upwards.
- Direct into the loop obtained by horizontal crossing.
- Straighten out.
Pros of the "Oriental" method: the ability to elegantly play up even the coarsest textured fabric. Cons: too massive, not recommended for slender men, models made of thin fabric do not hold their shape well. This is a great way to elegantly tie even a very wide tie made of thick material. The length of the free ends remains significant, which allows large men to successfully use this knot.
Van Wijk
An unusual knot for brave gentlemen was invented by a lady, artist Lisa Van Wijk. Let's tie the "Van Wijk" step by step:
- Turn the tie right side out. When crossing, the wide end should remain on top.
- Make three full turns of the wide part around the vertically positioned narrow part. Each subsequent turn should be located slightly lower than the previous one. The result will be an inverted cone of three steps. Do not tighten the loops too tightly.
- Pull the wide part through the loop created during the first turn.
- Straighten, tighten.
"Van Wijk" looks good on ties of any length and width. The collar can also be of any style. It looks most impressive on light models.
Prince Albert
It is made according to the same pattern as the simple one, but with two turns around itself. This technique of tying a tie is recommended for thin gentlemen. To get a sophisticated, slightly asymmetrical knot, you will need a thin accessory up to 5-6 cm wide. "Prince Albert" is relatively easy to tie:
- Turn the tie right side out. When crossing the sides, the wide side remains on top.
- Make two full turns around the narrow end.
- Pull up through the collar loop. Direct down into the gap created after two turns.
- Tighten, straighten.
The method is recommended for shirts with medium and wide button-down collars. The double knot takes away some of the length, so it is not recommended for very tall men.
The name of the method comes from the name of the English prince Albert of Saxe-Coburg and Gotha, who was a trendsetter.
Murrell
The Murrell is similar to an inverted Windsor: the narrow end remains visible, on the outside of the tied tie. It was invented by Brent Murrell quite recently - in the mid-90s of the twentieth century. The knot has a symmetrical triangular shape and looks like a double layer. It is well suited for informal settings.
Sequence of actions:
- Turn the tie right side out. When crossing, the narrow part remains on top.
- Pull the narrow end through the collar loop, point upwards. Lower it diagonally to the left and wrap it around the loop again.
- Move the narrow end to the right, lift it up. Wrap it around the collar loop, and direct it down to the right.
- Pass horizontally along the front side. Pass up through the collar loop.
- Pass the narrow end through the gap created in the previous step.
- Pull up. The thin side remains on top of the wide side.
"Murrell" is worn with medium collars. Wide models of the accessory are suitable for this method of tying a tie.


Easy ways to tie
Tie knots differ not only in the tying technique. For intricate weaves, more turns are used, in which case the result is more voluminous and wider. But for such complex patterns, the usual length of 140 cm may not be enough, so a win-win option for any models and styles is simple traditional knots.
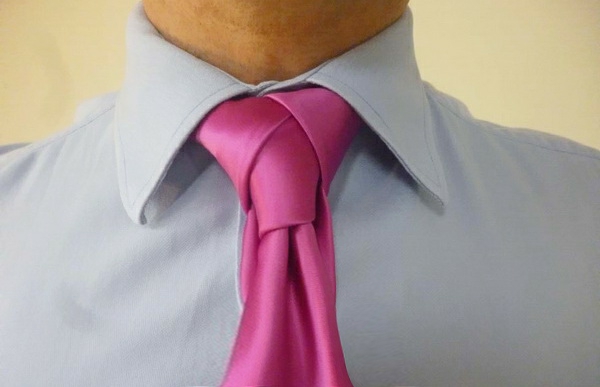
Classic knot
The following method will help you tie a tie in a triangle:
- Turn the product right side out. Leave the wide edge on the left, below the narrow one.
- Loosely cross the sides. The wide part should be on top with a tilt to the right, the narrow part with a tilt to the left. Pull the wide part to the left.
- Place it on the crossing point. The narrow edge remains in the middle and is positioned vertically.
- Pull the wide part through the resulting loop from the inside. Direction of movement: from right to left.
- Place the extended wide side diagonally on top. Wrap around the knot. The result should be two turns.
- Direct the wide part from the inside upwards. Leave the weave loose.
After all, you need to pull the wide end through the resulting loop. Check the symmetry, straighten, tighten.
Bow ties
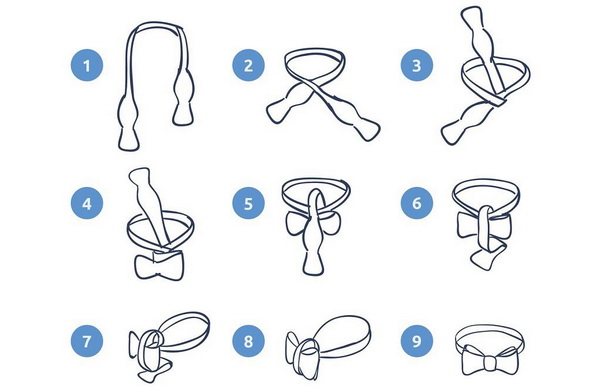
To tie a bow tie beautifully, you will need an extra hand or a lot of patience:
- Wrap the accessory around the collar. The left end should be 4-5 cm longer than the right. Cross, left on top.
- Pass the long end through the neck loop. Drop down to the left. Do not pull tight.
- Fold the curly part of the short end in half. Place the resulting "bow" in the center of the collar.
- Place the long edge exactly in the middle of the "bow". Without releasing the finished "bow", fold the other side in the same way and pull it from the bottom up under the front "bow". Repeat the turn.
- Move the folded long end to the left and pass it through the loop formed during the previous turn.
Next, you need to carefully place both "bows" exactly in the center. Pull the ends in different directions to tighten the knot. Straighten.
What methods are suitable for narrow models?
All these tying methods are not universal and can baffle inexperienced fashionistas. There are techniques that are only suitable for wide, massive models, and there are options that are used only for narrow accessories. Among the latter:
- quarter;
- "Half Windsor";
- cross or "Christensen".
The standard width of modern ties ranges from 8.25 to 9.50 cm. Narrow ties are those that are no wider than 6.5 cm. To avoid making a mistake with your choice, you must follow these rules:
- the width of the lapel of the suit should be comparable to the width of the tie;
- Large men should not choose models that are too narrow;
- Slim fits are good for casual wear, but not always appropriate for formal events.
To get full information, you can find videos with step-by-step instructions - watch and tie the knot at the same time. If you are not lazy and practice more often, each time it will be easier to perform the process. And after a short period of time, tying a tie will already happen automatically.

Video